You can use Direct messaging to send order requisition and clinical summary details to a provider in another EHR system. This feature depends on the Direct participation status by other EHR systems and not all providers have this protocol in place. The recipient must have exchanged trust certificates with Surescripts; else, messages are not delivered to the recipient.
Contents
Send a Direct Message
Manage the Recipient List
Direct Message a Clinical Summary
Direct Message a Document from a Patient Chart
View and Manage Direct Messages
Set Up Direct Messaging
Direct Message in NextGen® Office EHR
Open a New Direct Message from Tasks & Messages in NextGen Office EHR
Do one of the following:
- Click
 on the left navigation bar. In the Tasks & Messages tool, click Direct Message.
 - Click
 on the top navigation bar. In My Messages, click Create Message. In the Tasks & Messages tool, click Direct Message.
Open a New Direct Message from within an Order
Do one of the following, select the order, and click Direct.
- In the chart, click the Orders tab.
- In an encounter, click O on the SOAP menu and select Order History.
- In an encounter, click O on the SOAP menu and select Order Results.
- In an encounter, click P on the SOAP menu and select Orders > New Consult. When you create a consult order, the Orders page opens.
Send a Direct Message
- Scroll to the bottom of the window and type the recipient's Direct address in the To field or select a recipient from the favorites list and the address will fill in the To field.
- Type the subject.
- Type the message in the text box.
- Click Save.
Manage the Recipient List
Manage Favorites
- For instructions on how to save an address as a favorite, see Manage the Directory or Add a Provider to Favorites.
- To search for saved favorites, enter the recipient information and click Search.
- To remove the recipient from favorites, click the recipient's name and click Remove Selected from Favorites.
- To show more recipient contact information, click
 .
. - To fill the recipient's Direct address, click the recipient's name from the favorites list.
Manage the Directory
A provider is available in the directory if the receiving EHR supplies a provider directory to Surescripts.
- To search for the recipient's Direct address, enter the search criteria and click Search.
Tip: Enter the provider's last name and location to narrow down results.
- To fill the recipient's Direct address, click the recipient's name from the search results.
- To add the provider to your favorites list, click Add Selected to Favorites.
Add a Provider to Favorites
To add a provider to your favorites list click New Address, enter the recipient's Direct address, first name, and last name and click Save as Favorite.
Direct Message a Clinical Summary
- In the encounter, click the encounter # to open Encounter Summary Preview.
- Click Clinical Summary.
- Click Send Direct.
Direct Message a Document from a Patient Chart
- In the chart, click the Administrative tab.
- In the Documents section, select the document's row.
- Click
 .
.
The New window opens.
- Click Direct Message.
- Scroll to the bottom of the page. The document's name appears next to Attachment.
- Continue to send a direct message.
View and Manage Direct Messages
Users who have the permission to direct message on behalf of a provider (set up in Administration: User Maintenance) can view and manage their associated providers' direct messages.
Perform Actions from the Inbox in Tasks & Messages
Received messages appear in the inbox. If the Direct Message tab is red, you have an unreviewed message (status = new). To open the message, click the subject button.
You can filter messages by provider or status.
- Users who can direct message on behalf of a provider can select which provider to manage messages for. Associated providers are set up in Administration: User Maintenance. Select the provider from the Providers list.
- To show all, new, or viewed messages, click All, New, or Viewed.
- To mark a message as new or viewed, select the message's check box and click Mark New or Mark Viewed.
- To delete a message, select the message's check box and click Delete.

Messages with attachments have  in the last column. To preview, download, or save the attachment file to the patient chart, click the file and click Preview, Download, or Save to Chart.

Manage Direct Messages from My Messages
Received messages appear in the Direct Messages tab by default. Users who have the permission to direct message on behalf of a provider can filter the direct messages that appear by selecting the associated provider from the Providers menu).
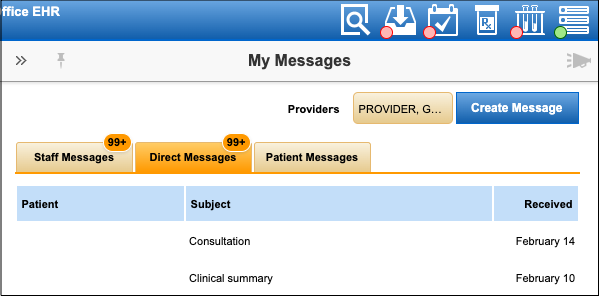
To preview, download, or save the file to the patient chart, click the file and click Preview, Download, or Save to Chart.
Save a Document to the Patient Chart
The document type, title, and document date automatically fill. All other fields are optional. Fill in the desired fields and click Save. Documents are saved to the Documents section in Administrative.
- When you select the Yes button for Review Required Task, the User menu, Priority menu, and Notes field show. A task will be created.
- User defaults to the first user alphabetically.
- Priority defaults to normal.
- Content typed in the Notes field appears in the task.

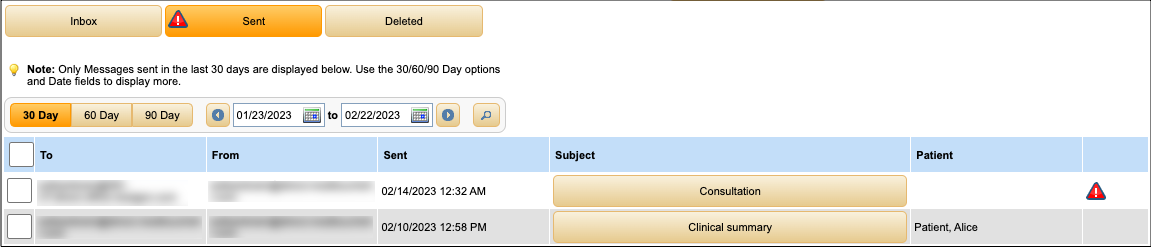
View Sent Messages in Tasks & Messages
To view sent messages, click Sent. If an alert appears on the Sent button, the message failed to send. To view the error message, click the error icon in the last column.
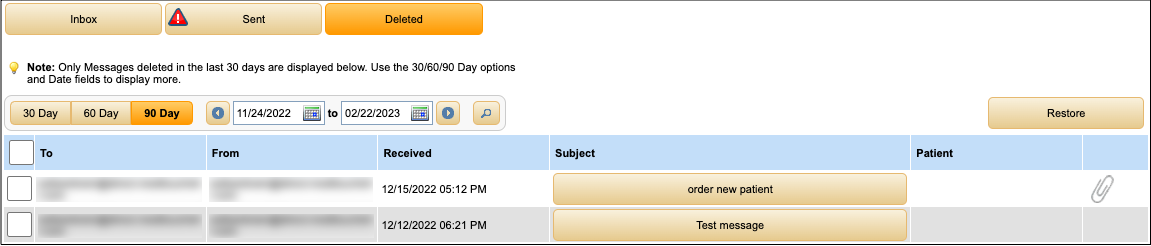
View Deleted Messages in Tasks & Messages
To view deleted messages, click Deleted. To restore a message, select the message's check box and click Restore. The restored message will appear in the inbox marked as new.
Set Up Direct Messaging in NextGen Office PM
Open a New Direct Message from Tasks & Messages in NextGen Office PM
- Click Tasks & Messages on the navigation bar.
- Click New Tasks & Messages.
The Tasks & Messages tool opens.
- Click Direct Message.
Set Up Direct Messaging
Set up direct messaging in Administration: Provider Maintenance.
- Type the desired direct message address.
- Click Save Provider Info.
After the direct message address has been set up, you can associate other users to this address to send messages on behalf of providers in Administration: User Maintenance.
- Scroll to the Direct Message section and select the Allow Direct Messaging on Behalf of check box.
- Select the provider from the list on the left and click Add.
See Also:
Administration: Provider Maintenance
Direct Messaging Supported File Formats
Tasks and Messages
Last Update: 7/27/25

