E-visit is a premium Patient Portal feature. Contact your sales representative to subscribe.
Disclaimer
This article provides workflow suggestions for e-visits (telehealth visits) and is not intended to provide clinical, legal, healthcare coding, or billing advice. Clients should verify that the information presented here is still applicable and valid. Additionally, practices should check with their malpractice carrier to verify liability coverage for offering telehealth services.
Contents
Schedule the E-visit Appointment in Practice Management
Appointment Check-in in Patient Portal
Document an E-visit in EHR
COVID-19 Pandemic Considerations
The COVID-19 pandemic has increased the demand for telehealth. While you can use this recommended workflow to document an e-visit in general, we provide tips to help practices document Coronavirus (COVID-19) cases.
The information in this article may change as health policy surrounding COVID-19 evolves. Medicare, Medicaid, commercial payers, and states have all taken action to remove policy barriers to telehealth utilization to address this public health emergency.
Schedule the E-visit Appointment in Practice Management
Requirement: Add E-visit Appointment Types
- Hover over the Schedule menu and select Calendar > Day View.
- Click the time.
- Select the E-VISIT appointment type.
- Search and select the patient's name.
- Complete the relevant fields and options.
- Click Save Appointment.
You can also schedule e-visit requests that patients send from the Patient Portal.
Appointment Check-in in Patient Portal
Requirement: The patient must have an active Patient Portal account. Tip: If the patient's portal access is in inactive, pending, or expired status in the chart (in PM), click Reset Password or Generate Password.
- On the home page, patients click the Appointment Check-in tile.
Patients can complete intake information before joining an e-visit.
- Patients can enter HPI and the provider can modify the HPI during the SOAP workflow.
- Patients can enter exposure history and the provider can modify as part of the reason for visit.
- Patients can complete Review of Systems information and the provider can modify during the visit.
Patients can use the navigation menu at the top of the page to review and fill out each form. They can also click a check-in process form link.
- Click NEXT at the top of the page to continue to navigate the check-in process until it is complete. Patients can also use the navigation menu to select a form to fill out.
Patients can use the check-in process to share information with the provider. This information gets pulled into Subjective section of the encounter summary in EHR.
Note for practices: Practices can customize the check-in process or use the default forms that NextGen® Office provides.
In our example, we customized a Coronavirus (COVID-19) form based on the Respiratory > Cough Chief Complaint Form.
Patients do not have to complete all forms to complete the check-in process. When the patient completes a form, a green checkmark  appears next to the step.
- When patients are done filling out the intake forms, they click Complete Check-in Process.
The e-Visit window opens. The patient appears on the left side of the screen and the provider appears on the right side.
For more information on how patients use the E-visit feature on the Patient Portal, refer to Use E-visits as a Patient.
Document an E-visit in EHR
E-visits are documented in EHR using the same templates and tools as an in-person visit.
Start the E-visit
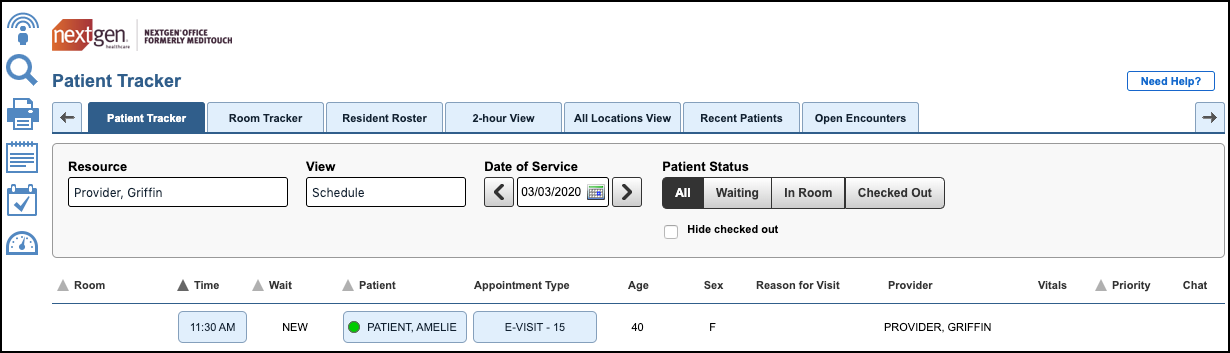
In Patient Tracker, click the Time.
Note: To see if the patient has completed check-in on the Patient Portal, check to see if the provider's name shows under Provider, which means the encounter has been created.
The E-Visit screen appears at the top of the Encounter Summary Preview. The provider appears on the left side of the screen and the patient appears on the right side.
Subjective
Scroll down to the Subjective section, where you see all of the intake responses that the patient entered during the Patient Portal check-in process. You should enter all information that the patient shares with you about themselves in the Subjective section. You can edit this section as necessary during the encounter.
Objective
The provider enters Objective, Assessment, and Plan information.
Physical Exam
Even though the physical exam is limited to what you can observe over video, you can document any patient-reported vital signs as a SOAP note.
Example: The patient shares that they have been checking their temperature daily and says the highest it has been today is 102.5. You would add this patient-reported observation as a free-text SOAP note (either type or dictate) to Physical Exam. Other vitals can also be documented in this way such as height, weight, and blood pressure. If the patient can show you the thermometer on camera that shows the reading, you could add that reading to Vital Signs in the Objective section.
Other visual exam findings include:
- Constitutional
- Respiratory effort
- Skin pallor or rash
- Psychiatric evaluation (oriented to person, place, or time)
- Other (varies by reason for visit)
You can also use blueprints or body systems and phrases available in Physical Exam.
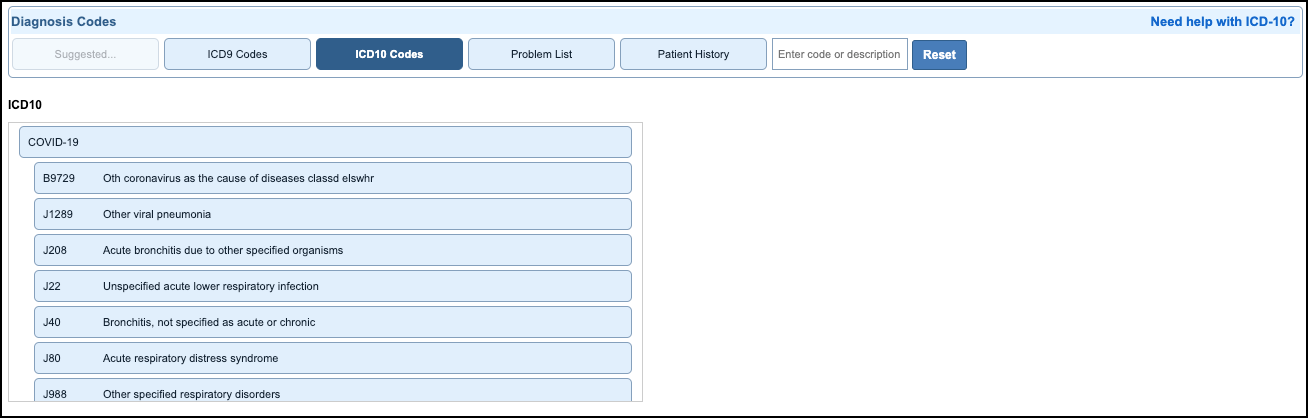
Diagnosis Coding
There are suggested codes based on the Chief Complaint Form. You can create a custom diagnosis panel in Administration: Diagnosis Panels. We created a custom panel for COVID-19. For a list of ICD-10 codes that you can use for COVID-19, refer to ICD-10 Codes Related to COVID-19.
Plan
Prescribe medications (in Prescribe) and order labs or tests (in Orders) as you normally would.
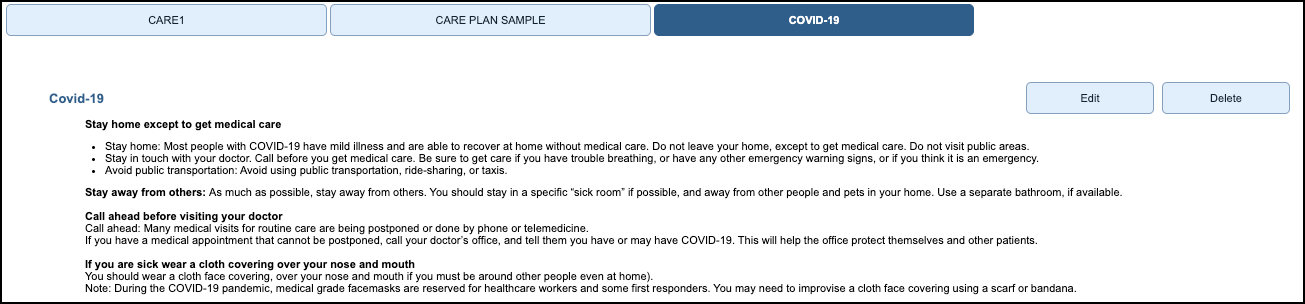
Care Plan
You can create a custom care plan in Administration: Care Plans or click Create New. We created a custom care plan for COVID-19.
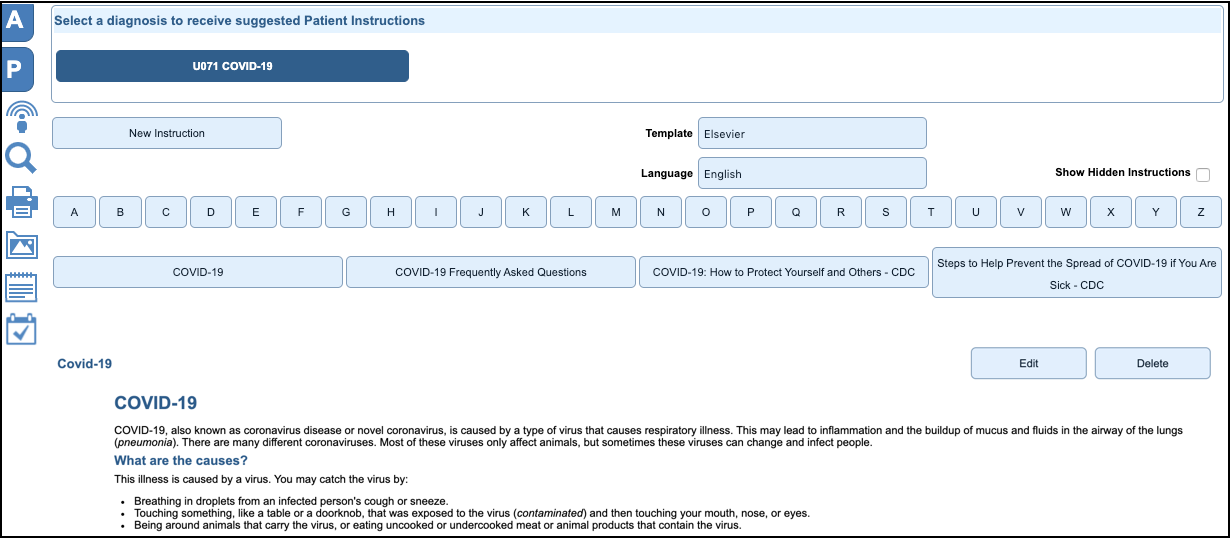
Patient Instructions
There are built-in patient instructions or, if you are subscribed to premium patient education by Elsevier, patient instructions are suggested based on diagnosis. The patient instructions are posted to the patient's Patient Portal account in Patient Summary.
Procedure Coding
- There are telehealth parity laws in most states, but they differ from state to state. Check with your commercial payers regarding coverage for telehealth services.
- Use the same E&M codes that you used before and document at the same level. If the code is time-based, evidence of time must be documented.
- Medicare requires modifier 95, indicating that the service rendered was actually performed via telehealth. Check with your commercial payers to determine which modifier they require.
- For COVID-19 testing codes, refer to CPT and HCPCS Codes for COVID-19 Testing.
| CPT and HCPCS Codes | Description |
|---|
Common telehealth services include:
- CPT code 99201-99215
- CPT code 99211-99215
- HCPCS code G0425-G0427
- HCPCS code G0406-G0408
List of Medicare Telehealth Services |
- Office or other outpatient visits for the evaluation and management of a new patient
- Office or other outpatient visits for the evaluation and management of an established patient
- Telehealth consultations, emergency department, or initial inpatient
- Follow-up inpatient telehealth consultations furnished to beneficiaries in hospital or skilled nursing facilities
|
Billing for E-visits in PM
Effective March 6, 2020 and until the public health emergency is over, telehealth visits are considered the same as in-person visits and Medicare pays at the same rate as regular, in-person visits. Check with your commercial payers regarding coverage for telehealth services.
When billing professional claims for nontraditional telehealth services with dates of services on or after March 1, 2020 and for the duration of the public health emergency, Medicare requires:
- POS 02: Telehealth Provided Other than in Patient’s Home (POS description currently says Telehealth)
- POS 10: Telehealth Provided in Patient’s Home (POS description currently says Unassigned, but will work for claim submission)
Tip – Use Blueprints as a Timesaver
You can use the Save as Blueprint feature to help conduct efficient visits and quickly document encounters. You can use this feature for any encounter and can save any part or all of the encounter summary that you used (for example, delete the Subjective section since it's patient-specific and can be entered by the patient during Patient Portal appointment check-in).
For example, this article presented a typical COVID-19 e-visit and can be saved as a blueprint for reuse, freeing up time to see more patients.
Create a Blueprint
- Click the Encounter # within the current encounter.
- Below Manage the Encounter Content, click Save as Blueprint.
- Deselect whichever SOAP sections or notes that you do not want to reuse.
- Select a Body System (for this example, we select Respiratory).
- In the Create a New Blueprint field, enter the name of the blueprint (we use COVID-19) and Description.
- Click Create.
Use a Blueprint
- Within the new encounter, click Grand Central (where all blueprints are).
- In the Blueprints section, click the body system (our example uses Respiratory).
- Click the blueprint name (our example uses COVID-19).
- Click Import.
- Click Preview Encounter.
See Also:
CPT and HCPCS Codes for COVID-19 Testing
ICD-10 Codes Related to COVID-19
Set Up and Use E-visits
Updated 4/24/2025

