Post a patient payment from within the chart or during appointment check-in. After the payment is posted, the funds can be applied to charges (refer to Apply Patient Payments or Auto-Apply Patient Payments) on the patient’s ledger.
Offline vs Online Payments
- Offline payments: Payments collected outside of NextGen® Office, which include cash, check payments, or credit card payments collected by mail, phone, or a third-party system.
- Online payments: Credit card payments collected using the credit card processing integration within NextGen Office.
Post a Payment from within the Patient Chart
Post a Cash or Check Payment
- In the patient's chart, click Post Payment.
- On the Post Patient Payment screen, select the Batch (optional). If the batch has a Location and/or Deposit Date, they will be used to populate those fields and thereby overwrites what is currently in those fields.
- Select the Location, Provider, and Deposit Date (all optional). The Deposit Date defaults to the current date. This field is used for payment search criteria and for deposit date custom reporting.
- Select the payment type: Cash or Check
- If this is a check payment, enter the check # in the Authorization No. field
- Enter payment amount in the Amount Collected field and distribute the amounts to the applicable fields.
- Click Post Payment.
After the payment is posted, it displays on the patient’s chart.
Post a Credit Card Payment from within the Patient Chart
Refer to the Post a Credit Card Payment from within the Patient Chart section in Post Credit Card Payments.
Post a Payment during Appointment Check-in
Post a Cash or Check Payment during Appointment Check-in
- Hover over the appointment time and then select Check-In.
- On the Check-In page, scroll down to the payment section.
- On the Post Patient Payment screen, select the Batch (optional). If the batch has a Location and/or Deposit Date, they will be used to populate those fields and thereby overwrites what is currently in those fields.
- Select the Location, Provider, and Deposit Date (all optional). The Deposit Date defaults to the current date. This field is used for payment search criteria and for deposit date custom reporting.
- Select the payment type: Cash or Check
- If this is a check payment, enter the check # in the Authorization No. field
- Enter charge amount in the Amount Collected field and distribute the amounts to the applicable fields.
- Click Post Payment.
- Once the payment is posted, click Print Payment Receipt (optional).
- To complete check-in, click Appointment Check-In.
Post a Credit Card Payment during Appointment Check-in
Refer to the Post a Credit Card Payment during Appointment Check-in section in Post Credit Card Payments.
Auto-apply Outstanding Balance
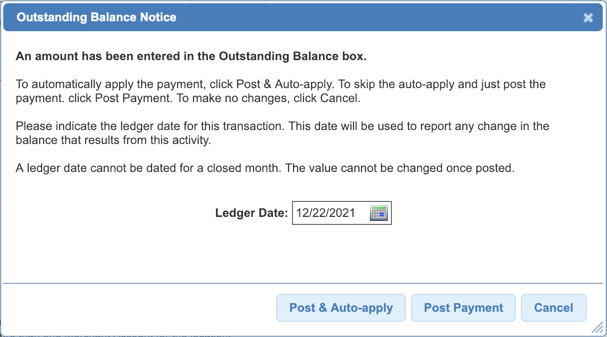
When a payment amount is dispersed to the Outstanding Balance, you can choose to automatically apply this amount to the service line charges that make up this balance. Service lines are applied from oldest to newest. When you click Post Payment, the following window opens.
- To accept the automatic application of the payment amount, click Post & Auto-apply.
- To post the payment without auto-applying, click Post Payment.
Last Update: 6/30/2025

