This article describes how to manually register a new patient and create a patient's chart in NextGen® Office Practice Management.
Mandatory Sections
Optional Sections
Open Patient Registration
Do one of the following:
- From the Real-Time menu, select Eligibility Request to check insurance eligibility. Click Create Chart to create a chart for a new patient. For more information, refer to Real-Time Eligibility Request.
Note: If the patient is self-pay, the patient is not eligible, or the payer does not allow real-time eligibility checking, you must manually create the chart.
- On the PM Dashboard, under Shortcuts, below Patients, click Register a New Patient.
- From the Patients menu, select Register a New Patient.
Patient Information
Record the patient demographic information, account information, patient and emergency contact information, and primary caregiver, legal guardian, and healthcare proxy details.
- Enter the required patient information.
- Click Save Changes before proceeding to the next section.
Patient Demographic and Contact Information
Save a Patient as a Resident of a Location
For clients who service nursing home patients, the nursing home is set up in the system as a location. When you register a new patient and associate the patient with the location, an additional option is provided to establish that the patient is a resident of the location. When you select this option, the location's address and phone information auto-fill in the fields.
- Select the Patient is a resident of a Practice Location check box.
- Search for the desired location. You can search by location name, city, state, or zip code.
- Select the location to auto-fill the address and phone number.
The address and phone information only fills in the chart when registering a new patient. When editing an existing patient chart, the address and phone information must be manually updated.
Account Information
| Field | Description |
|---|
| Chart No. | Auto-generated when the chart is saved.
Your practice can use its own numbering system, but NextGen Office will not keep track of it. |
| Date Registered | Defaults to the current date. |
| Account Type | Use cases are Workers' Compensation or auto accident patients. Use this option to create a separate chart for these cases.
See account type notes. |
| Date of 1st Occurrence | Required if you select an account type. See bullet 3 in the account type notes. |
| Account Status | Current (default) or archived |
| Account Secondary Status | Deceased or collections statuses |
| Exclude from A/R Balance Billing | Select this check box if the patient should not receive any statements or bills. Example: Patient should not be billed because of an accident or arbitration. |
Account Type Notes
- Account Type (under Account Information) is optional and must be selected if the patient requires another chart (for example, the patient requires both a personal and a Workers' Compensation chart).
- Should be used if the practice has multiple patients with the same name.
- If you select an account type, the Date of the 1st Occurrence is required. Enter the date of the occurrence if applicable; else, enter the patient's date of birth (DOB).
- For Workers' Compensation cases, the date of first occurrence is the accident date.
- When searching for a patient, the Account Type and the date of first occurrence or DOB appears.
Insurance Information
Once you save the patient information, the Insurance Information section opens.
- Click Add an Insurance Profile.
- If the insured's data already exists in the NextGen Office system, search for the existing insurance profile. To assign this profile to the patient's chart, click Use Selected Profile; else, manually enter the insurance information.
- The system may suggest a possible related family member. To copy the insured's demographic information, click Use As Insured. To use a suggested existing insurance profile, select that profile and click Use Selected Profile.
- Complete the insurance information.
- Click Save Changes before proceeding to the next section.
Notes
- For patients without insurance, create a self pay insurance profile. Select Self Pay as the Payer Name. The patient's chart number auto-fills in the Insured's ID Number field.
- If you incorrectly enter the subscriber information, delete the profile and reenter the insurance profile details.
| Field | Description |
|---|
| Payer Class | Indicates the fee schedule. |
| Payer Type | Corresponds with box 2 of the CMS-1500 claim form. |
| Plan Name | May be entered at any time or set up in advance in Administration: Payer Plan Maintenance. |
| Group No. | Corresponds with box 11c of the CMS-1500 claim form. |
| Co-pay | Viewable from within the patient chart, scheduling pages, and when posting a patient payment. |
| Co-Ins | Viewable from within the patient chart and scheduling pages. |
| Accept Assignment | Corresponds with box 27 of the CMS-1500 claim form. |
Guarantor Information
Once you save the insurance information, the Guarantor Information section opens. The guarantor is the financially responsible party for the patient. Statements are mailed to the guarantor.
- Guarantor Relation to Patient defaults to Self and the patient's details are automatically populated in the required fields.
- If the guarantor is not the patient, select Other and enter the guarantor's information.
- If the guarantor's profile already exists in the database, search for guarantor's profile. To select the guarantor, click Select and Save. The guarantor's information will auto-fill in the fields.
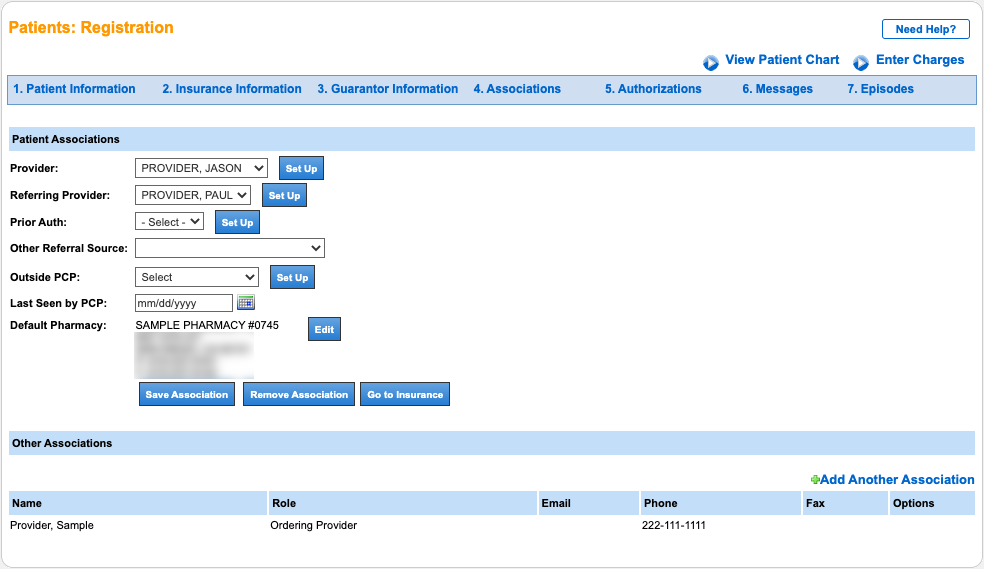
Associations (Optional)
The Associations section shows the default provider and referring provider associated with the patient.
- Provider: Enables you to create statements for all patients associated with this provider.
- To open Administration: Provider Maintenance > My Providers, click Set Up.
- Referring Provider: Defaults that referring provider on all appointments and claims.
- To open Administration: Provider Maintenance > Referring Providers, click Set Up.
- Prior Auth: Defaults the number on all appointments and claims.
- To open Authorizations, click Set Up.
- To add an association, click Add Another Association.
Authorizations (Optional)
Create prior authorizations in the Authorizations section (click New Authorization).

Messages (Optional)
Add a note or an alert to the chart in the Messages section. For information and instructions on how to create a chart note or alert, refer to Practice Management Chart Messages.
Episodes (Optional)
Create patient episodes in the Episodes section.
- To create a patient episode, click New Episode.
- To use this episode as the default for future use, select the Default Episode for all Future Appointments and Encounters check box.
Last Review Date: 10/27/25

