You can set up NextGen® Pay powered by InstaMed payment plans for your patients to make installment or recurring payments on a schedule. Payments are automatically created in NextGen Office PM and applied to the oldest balance. After a payment plan payment is posted, it appears in Payments Overview.
Practice Requirements
NextGen Pay powered by InstaMed credit card integration
Benefits of NextGen Pay Payment Plans
Patient collections is an increasingly difficult challenge for providers. According to JAMA Networks, nearly one in five individuals has medical debt in collections, and the total amount of medical debt is 140 billion. When patients use credit cards to pay healthcare bills, they may incur high interest rates and terms that make it hard to pay the bill in full.
Providers need a new revenue cycle model that improves the patient financial experience and makes it easier for patients to pay by credit card using payment plans, which are customized to each patient’s unique financial situation. Payment plans can reduce the likelihood of unpaid balances being sent to collections or written off in the future. Collecting payments for outstanding balances can be done with fewer statements and patient calls.
Set Up a Payment Plan from Appointment Check-in
You can set up a payment plan for a patient during appointment check-in.
- In NextGen Office PM, on the Check-In page, scroll down to the payment pane.
- Select the location and terminal alias.
Selecting the provider is optional. The deposit date defaults to the current date.
- Select Manage Payment Plan.
The InstaMed Payment Plan window opens to the profile screen.
- Select Pay Over Time.
The Payment Plan screen opens.
- From Payment Type, select PAYMENT PLAN.
- Under SCHEDULE, select the Installment or Recurring option.
- Continue with the Set Up an Installment Payment Plan steps.
- Continue with the Set Up a Recurring Payment Plans steps.
Set Up a Payment Plan from within the Patient Chart
- In NextGen Office PM, open the patient chart.
- Select Post Payment.
- Select the location and terminal alias.
Selecting the provider is optional. The deposit date defaults to the current date.
- Select Manage Payment Plan.
The InstaMed Payment Plan window opens to the profile screen.
- Continue from step 4 in the appointment check-in procedure.
Set Up an Installment Payment Plan
Patients can use installment payment plans to pay down their outstanding balance over a period of time.
- Enter the total amount due.
- Optional: Enter the initial payment amount that the patient wants to make today.
If the patient makes an initial payment, the number of payments changes depending on the initial payment. The number of payments includes the initial payment as a separate payment.
Example: The patient has an outstanding balance of $1,000 and wants to pay $100 per month, which equates to 10 payments. She makes an initial payment of $500, which reduces her balance to $500 and the number of payments to 6 (5 monthly payments + her initial payment = 6).
- Select the frequency.
- Enter the payment amount.
The system automatically calculates the number of payments based on these responses.
- Select the start date.
- Optional: Add a payment.
- Select or add a payment method.
- Select Save.
The Payment Plan Receipt window opens. There are options to email, download, or print the receipt at the top of the window. You can work with InstaMed to customize the message at the bottom of the window.
Note: If you process an initial payment for the patient, the Credit Card Transaction window opens in front of the Payment Plan Receipt window.
When you close the Payment Plan Receipt window, you return the InstaMed Payment Plan profile screen. When you close the InstaMed Payment Plan window, you return to the patient chart. A message appears at the top of the patient chart that says you successfully created a payment plan. When you make changes to a payment plan, a message appears at the top of the patient chart that says you successfully updated the payment plan. The final step in the payment plan setup is to update the account secondary status.
Set Up a Recurring Payment Plan
Patients can use recurring payment plans to pay a recurring amount over a period of time (for example, memberships).
- Optional: Enter the initial payment amount that the patient wants to make today.
- Select the frequency.
- Enter the payment amount.
- Select the start date.
- Optional: Add a payment.
- Select or add a payment method.
- Select Save.
The Payment Plan Receipt window opens. There are options to email, download, or print the receipt at the top of the window. At the bottom of the window below Next Scheduled Payments, you can see when the next scheduled payment will occur. You can work with InstaMed to customize the message at the bottom of the window.
When you close the InstaMed Payment Plan window, you return to the patient chart. A message appears at the top of the patient chart stating that you successfully created a payment plan. When you make changes to a payment plan, a message appears at the top of the patient chart that says you successfully updated the payment plan. The final step in the payment plan setup is to update the account secondary status.
Add a Payment
You can manually add a payment method under ADD A PAYMENT.
- Enter the amount.
- Select the date.
- Select Add.
Add a Payment Method
You can add a credit card payment method under PAYMENT.
- From Payment Method, select NEW PAYMENT METHOD.
Note: If this is the first credit card you are adding for the patient, NEW PAYMENT METHOD is already selected. The Card option is selected by default. You can only add a credit card.
- You can either select Swipe and swipe the card or enter the credit card number and the expiration date.
Note: The cardholder's name is pulled from the patient chart.
- Select Save.
View Scheduled Transactions
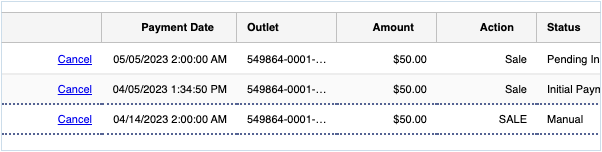
You can view the patient's scheduled transactions under NEXT TRANSACTIONS. In the image below, the first row displays the first installment payment for $50 scheduled to start on May 5, 2023. The second row displays the initial payment of $50 that will post today on April 5, 2023. The third row displays the additional payment of $50 scheduled for April 14, 2023.
Update the Account Secondary Status
After you have completed setting up the patient's payment plan, we recommend that you update the patient's account secondary status on the Post Payment Payment screen. There are other pages where you can perform this task that are provided after the procedure below. When you update the account secondary status, it is updated in all areas that include this status.
- On the Post Patient Payment screen, from Account Secondary Status, select Payment Plan.
- Select
 .
.

The payment plan account secondary status appears in the following areas:
- At the top of the patient chart and under Account Information next to the account status
- In the Collections module (next to the patient's name)
- In the account secondary status column in the AR Service Line Analysis Grid, Guarantor demographic report, Patient demographic report, Patient Financial Summary demographic report, and the Patient, Insurance, Guarantor Analysis Grid
You can also update the patient's account secondary status by doing one of the following:
- In the patient chart, select View/Edit Details. Under Account Information, from Account Secondary Status, select Payment Plan.
- In the Collections module, from the Hold for Review, Collections Cases, or Exported Cases tabs, select the patient's check box, select Update Account Status from the menu list, and select Go. From Secondary status, select Payment Plan and select Update Account Status.
Perform Tasks from the Patient Activity Pane
- To manage payment plans, select the amount link under Payment Plans or Scheduled Transactions. Make changes to the payment plan and select Save.
- To view transaction details and receipt, select the amount link under Transaction History.
- To change the payment plan's status, select a status from Set Status To.
Note: The payment plan is automatically set to inactive status if the credit card transaction is not successfully charged. The payment plan's status is automatically set to complete when the payment plan balance is $0.00.
Refunding and Voiding Payment Plan Payments
To refund a payment, select the amount link under Scheduled Transactions in the Patient Activity pane. Under NEXT TRANSACTIONS, select Refund and then select Save. You can also refund a payment in the InstaMed Portal. Refunds in InstaMed are not synced with NextGen Office PM. You must manually enter the refund in NextGen Office PM.
We do not recommend voiding payments in InstaMed since these actions are not synced with NextGen Office PM. Always initiate voids using the standard procedure in NextGen Office PM.
Filter Payment Plan Payments in Payments Overview
- In the patient chart, select Payment History.
- Select Search Payments.
- From Payment Type, select Patient - Payment Plan.
Payments with the credit card icon  with the hover text as Payment Plan next to the payment ID indicate that the payments are payment plan payments.
Identify Patients with Payment Plans in Statements
When you generate a patient statement, the statement displays a message that says that the patient will be charged per their payment agreement.
Identify Patients with Payment Plans in Reports
The account secondary status column is included in the AR Service Line Analysis Grid, Guarantor demographic report, Patient demographic report, Patient Financial Summary demographic report, and the Patient, Insurance, Guarantor Analysis Grid. Payment Plan appears in this column for patients who have payment plans.
Last Review Date: 10/25/25

