This article contains step-by-step instructions to complete Electronic Prescribing of Controlled Substances (EPCS) registration and eRx registration for ID.me, our third-party vendor. Our Self-Service pathway allows you to verify your identity by uploading identity documents and a video selfie.
Provider Requirements
- EPCS and eRx feature enabled in your account (request this feature from your Sales representative). Note > this will already be enabled if you currently prescribe controlled substances.
- Per our NextGen Office Identity Proofing with ID.me announcement. Continue using Exostar for EPCS two-factor authentication until an formal announcement.
Computer Requirements
- Use a computer to complete registration. iPads are not recommended.
- Use Google Chrome, Mozilla Firefox, or Apple Safari.
Note:
- All prescribers must complete identity proofing to prescribe medications.
- A prescriber who has completed EPCS registration is able to transmit a controlled medication.
- A user who does not have EPCS registration is able to prepare the Rx and leave it pending for the EPCS-certified prescriber, however, the EPCS registered prescriber must be logged in to transmit a controlled Rx.
Checklist
Make sure that the following information are available prior to EPCS registration.
- A smartphone with a camera
- Photo ID (U.S. driver’s license or state ID, U.S. passport, or U.S. passport card)
- Social Security number.
- NPI and DEA number.
- Second user with rights to complete Grant and Finalize steps.
Terminology
| Term | Definition |
|---|
| EPCS | Electronic Prescription of Controlled Substances |
| ID.me | Vendor partner for the identity proofing process. |
| IDP | Identity proofing. The process of legally verifying your identity. |
| OTP | One time passcode. The six-digit passcode received during the second phase of two factor authentication. |
| TFA | Two Factor Authentication. Using a combination of the username and password for the first authentication and an OTP for the second factor. This is the security measure that is required by the DEA for EPCS. The first factor, the username and password, is your login to NextGen® Office. The second factor, the OTP, will be activated during this process. |
| Vetting Process | The process by which your identity is verified during the registration process. |
| eRx | Electronic Prescription for non-controlled substance |
Before You Begin
Install the ID.me Authenticator App on the Prescribers smartphone.
Note: You will be instructed to download the ID.me Authenticator App once starting the process from Admin > e-Rx ID.me IDP & EPCS Registration.
- Look for the logo
 to make sure you are downloading the correct app.
 - Search the Apple App Store for ID.me Authenticator or Google Play for ID.me Authenticator.
- Before starting the registration process, install and begin setup of the app on the prescriber’s mobile phone.
- You are required to bind a token and you can use the app for this purpose. You will complete setup of the app during your ID.me registration.
- The app must be installed on a smartphone. Do not install the app on an iPad, tablet, or computer.
Verify Your Name
- If you are prompted to go through the webcam process with ID.me, make sure that the name you use is the same as the name used on your legal form of identification.
- If this information does not match your form of identification, update the information in Administration: Provider Maintenance - Rendering and Billing Providers before starting ID.me registration. If you do not update this information, you will not be approved during your webcam process with ID.me. After completing ID.me registration, you can switch back to the original name and address.
ID.me Registration
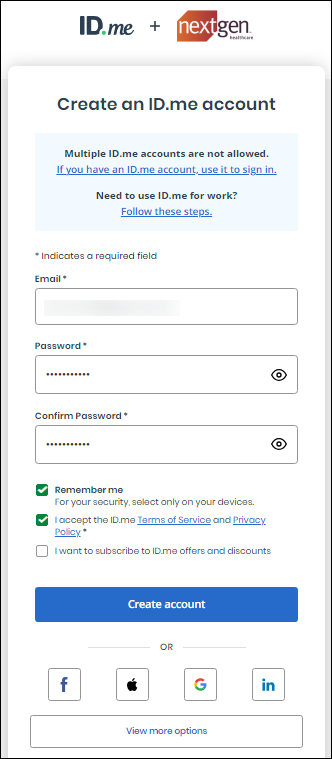
If you are new to ID.me, create an account following the steps below.
- In PM, select Admin.
- Select e-Rx ID.me IDP & EPCS Registration.
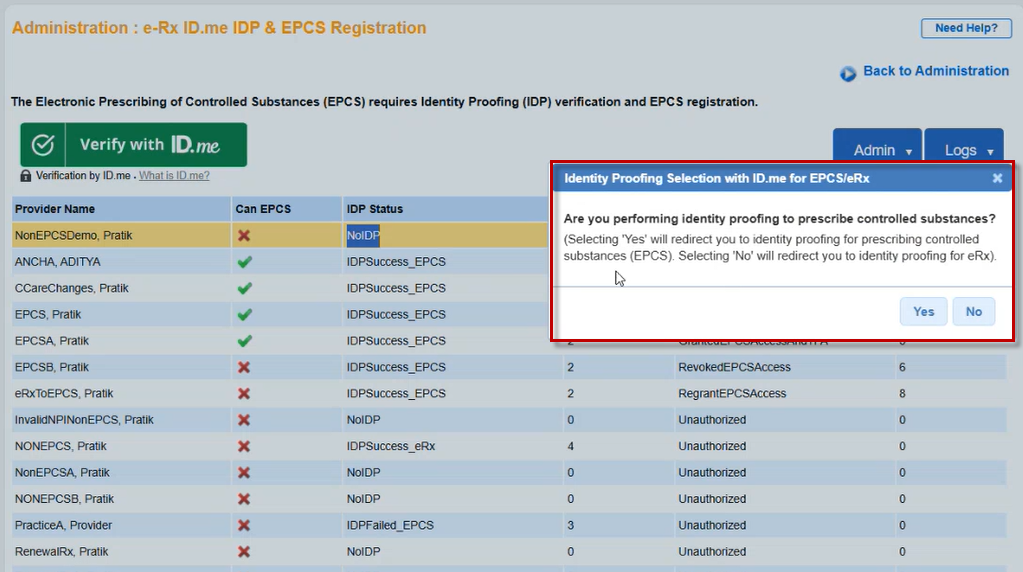
- To begin ID.me registration, select Verify with ID.me.
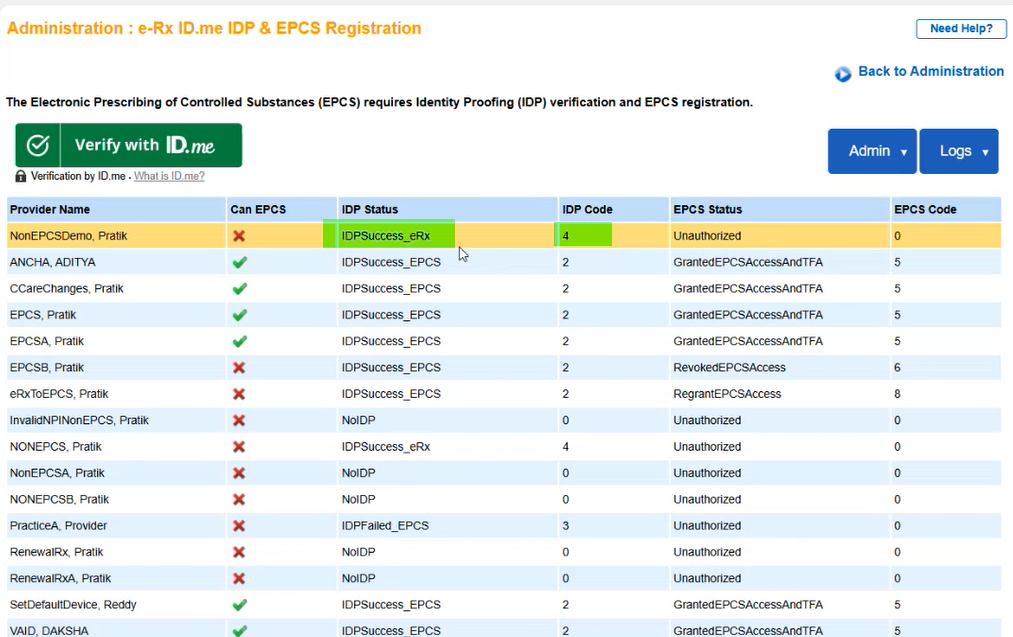
Note: All providers in the practice and their current ID.me statuses appear here. The logged-in prescriber is highlighted, and the Setup option applies to that provider. Ensure the information entered in ID.me (e.g. NPI/DEA) match to this prescribers information in Provider Maintenance.
- When initiating the identity proofing process, prescribers will be prompted to indicate whether they are performing identity proofing for prescribing controlled substances. If the prescriber selects "Yes," they will be redirected to the identity proofing workflow specifically designed for Electronic Prescribing of Controlled Substances (EPCS). If the prescriber selects "No," they will be directed to the identity proofing workflow for eRx, tailored for non-controlled substances. This ensures that the prescriber is guided to the appropriate pathway based on their specific prescribing needs.
- Enter the Email ID, and Password.
- Select the I accept the ID.me Terms of Service and Privacy Policy* checkbox.
- Select Create account.
- Confirm your email address by selecting the link that you have received in the email.
- Or enter the 6-digit code that you have received in the email.
- Select Resend my verification if you did not receive the email.
- If you already have an account with ID.me, Sign in to your ID.me account by giving your Email and Password, and selecting Sign in. Note > You may already have an ID.me account if you used this for taxes.
Identity Proofing with ID.me
- To complete identity proofing, you must have a smartphone with the ID.me Authenticator app.
- Your registration is complete when you are successfully approved, and your smartphone ID.me Authenticator App is bound to your ID.me account.
Review the subscriber agreement and then select I Agree.
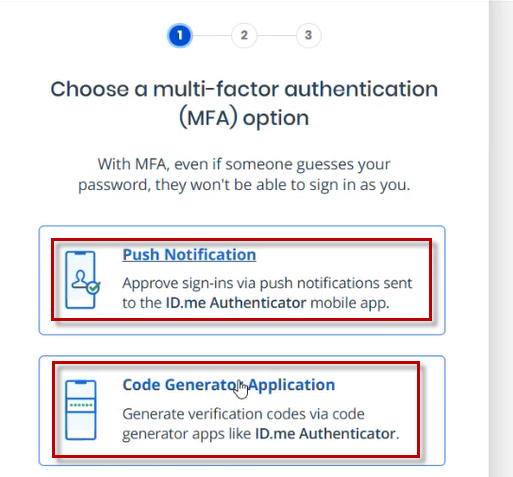
Multi-factor Authentication for your Account
Secure your ID.me account with multi-factor authentication by following the steps below
- Select Code Generator Application OR Push Notification.
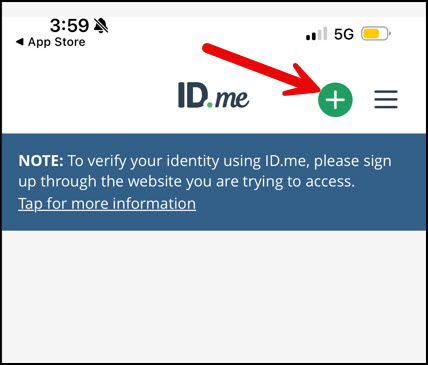
- Download an authenticator app (if not already done). You can use Text Message or Email to receive the link to download the app.
- To initiate this from the ID.me Authenticator App select the + in the top right corner.
- Select Scan QR Code or Enter Secret Key option, and select Continue.
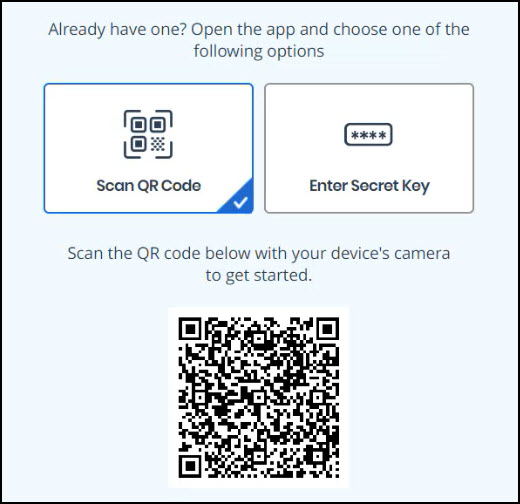
- Enter the 6-digit code and Name of your device, to confirm your device.
- Note > The Name of your device will display during the EPCS TFA process.
- Select Continue.
- On selecting continue, a success message is displayed as Your Account is Secure Now.
- You can generate a Recovery Code to retrieve the data if you lose your registered device.
Verify Your Identity
Once you register your device, verify your identity with the below steps.
- Select one of the Identity Documents to perform the verification method
- Upload photos of your License or State ID
- Upload a photo of your Passport
- Upload a photo of your Passport Card
- Select the I acknowledge that I have received, read and agreed to these terms checkbox to give your consent for collecting and verifying your biometric information.
- Select Continue.
- Enter the registered Mobile Number to receive notifications through text message or voice calls for verifying your document and select Continue
- If you do not have a smartphone, select I don't have a smartphone.
- Select a .jpg photo page of your selected Identity document and select Continue. Make sure that the image is clear, all required information is visible, and the photo does not exceed the recommended size.
- Select Take video selfie if you have a smartphone with a camera and a web browser.
- If you do not have a smartphone, select Take a selfie with my Webcam.
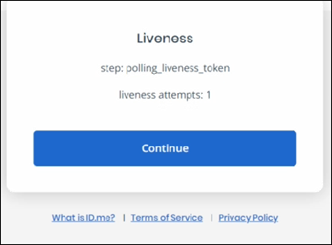
- Select Continue, if you are sure that if the action is not a fraudulent action.
- Select Report Fraud, if you are suspect that the action is a fraudulent action.
- On selecting continue, liveness attempts is displayed as below.
- Select Continue.
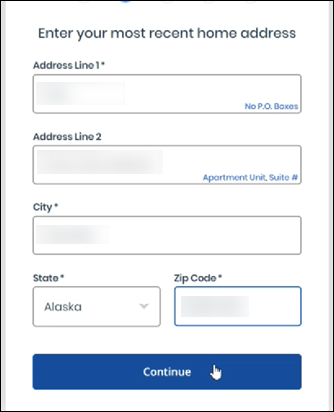
- Enter your recent Home Address and select Continue.
- Enter the Personal Phone Number. Note: Do not enter VOIP lines for ID verification.
- Enter the Social Security Number.
- Verify the entered personal information
- Select The Information I've provided is correct and I accept the use of Fair Credit Reporting Act data to verify my Identity checkbox and select Yes.
- Check whether your email address is correct and select Yes.
- Your Personal information is verified. The next step is to verify your medical provider information.
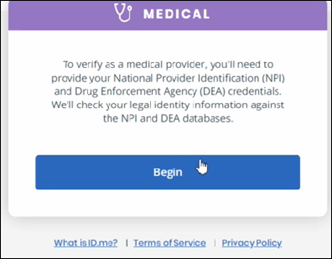
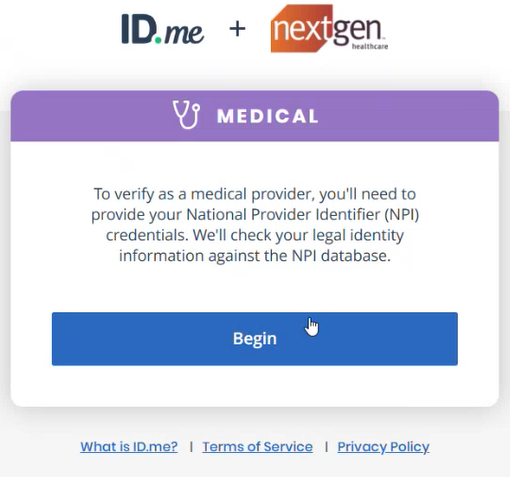
Verify Your Identity as a Medical Provider
Once your personal information is verified, begin with the verification of the information as a medical provider.
- Select Begin to verify your identity as a Medical Provider.
-
- For eRx prescribers (does not prescribe controlled substances)
- Enter your NPI number
- Select the State and enter the DEA number. (*This is not required if you are not completing the registration for EPCS)
- Select I am a resident or intern, and my DEA number is institutional checkbox and select Continue.
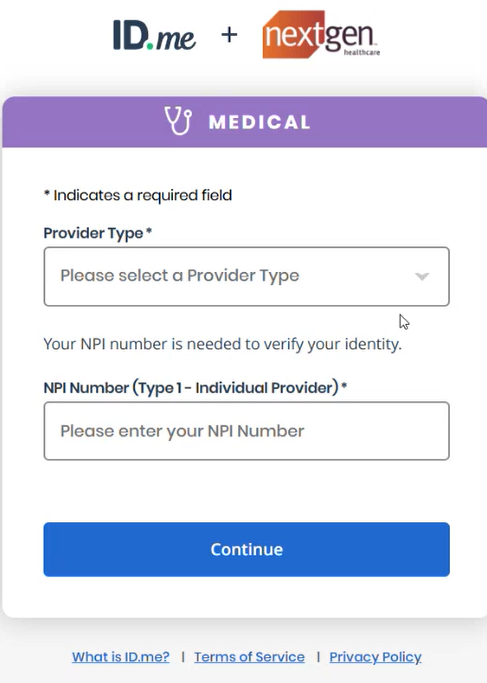
- Choose the Provider Type
- Select the Specialty and select Continue.
- A success message is displayed as You're Verified. Select Continue.
- Select Allow to allow NextGen Healthcare to verify your information.
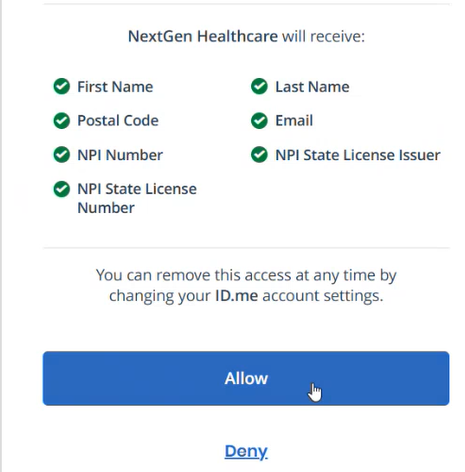
- Once you select Allow, your information is sent to NextGen Office to validate it against the NPI (for both EPCS and eRx) and DEA (only for EPCS) entered in Provider Maintenance.
- If the NPI and/or DEA entered in Provider Maintenance does not match to what is returned by ID.me your IDP proofing status in NextGen Office will fail. Update the information accordingly and start the Verify with ID.me process again.
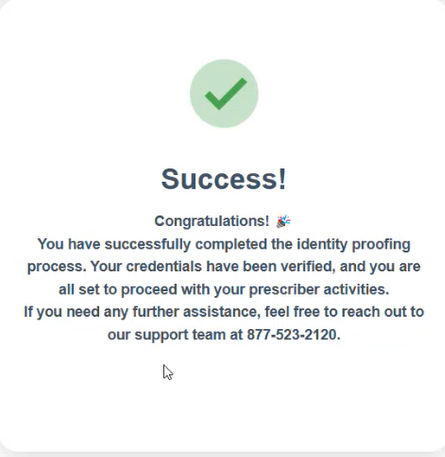
- A success message is displayed as Success. Identity Proofing has been successfully completed with ID.me.
- On successful completion,
-
- For EPCS prescribers, you can view the IDP Status as IDPSuccess_EPCS with IDP Code as 2 in Administration: e-Rx ID.me IDP & EPCS Registration page.
-
- For eRx prescribers, you can view the IDP Status as IDPSuccess_eRx with IDP Code as 4 in Administration: e-Rx ID.me IDP & EPCS Registration page.
After you reach this step, the following should be true:
- You are successfully vetted.
- You have at least one OTP method (Authenticator app) that will be used to transmit a controlled substance.
- You have set up either a text message or voice call option to access your ID.me account outside of your OTP device.
After the process is completed in ID.me, for EPCS prescribers there are two last steps that must be completed on the Admin screens. These steps are called the Grant and Finalize steps. You CANNOT complete the Grant and Finalize steps if you have NOT been approved with ID.me. After you are approved, you can complete the EPCS registration process with ID.me.
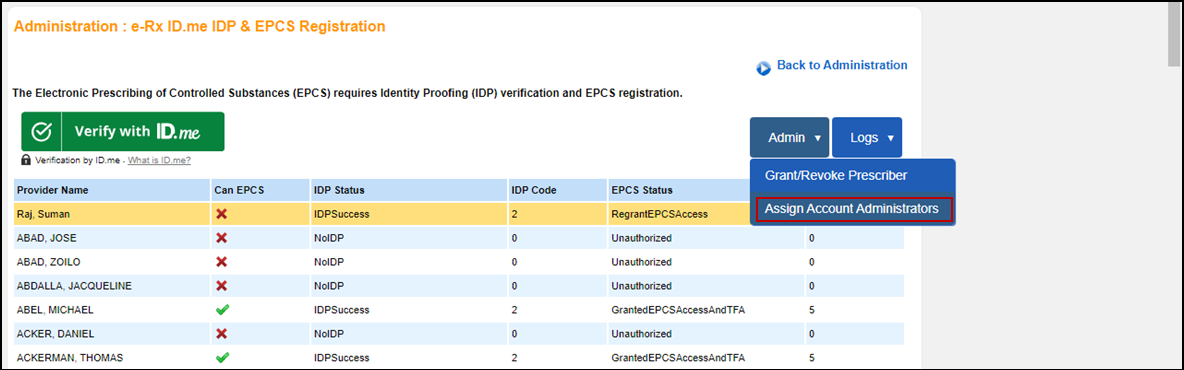
Assign Account Administrators
The Grant step is when an EPCS administrator confirms the identity of the prescriber. This is required by the DEA Audit. Anyone whose name is on the list and is NOT the prescriber can complete the Grant step as the EPCS administrator.
- In PM, select Admin.
- Select e-Rx ID.me IDP & EPCS Registration.
- Select Admin > Assign Account Administrators.
- List of users who are registered with ID.me are displayed.
- Select the checkbox against the name of the user and choose Select.
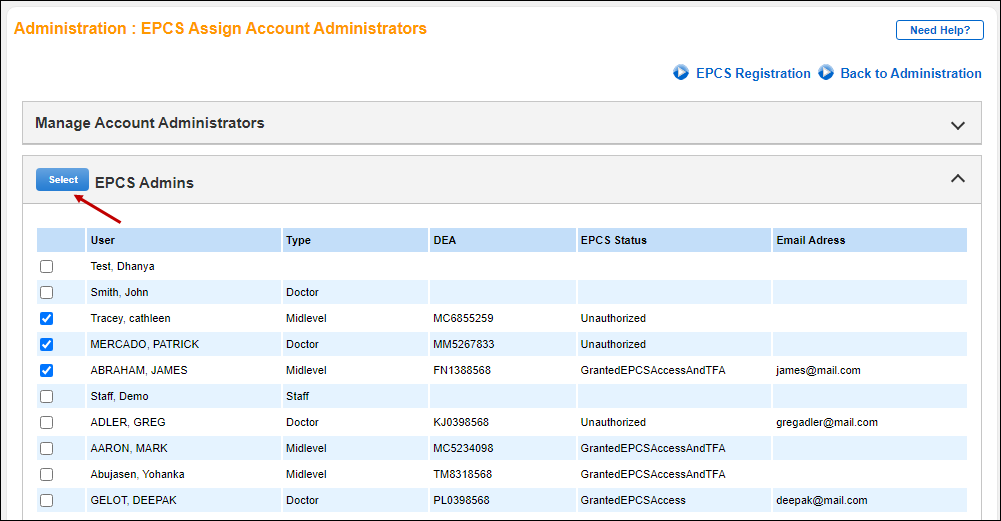
- On choosing, the selected users will be assigned as Administrators.
- A success message is displayed as Successfully Assigned 1 Administrator(s).
eRx Prescribers can Transition from eRx to EPCS
eRx prescribers can easily transition to EPCS by clicking on the Verify with ID.me link. When prompted for Identity Proofing Selection, prescribers should select Yes to proceed with the identity proofing process for EPCS. This streamlined workflow ensures a seamless upgrade to EPCS capabilities.
- Click Verify with ID.me button
- Select "Yes" in "Identity Proofing Selection with ID.me for EPCS/eRx" prompt
- Sign in to ID.me using your registered email and password
- Verify your Identity (this process is similar to the identity proofing for EPCS prescribers )
- Verify your credentials by providing your NPI and DEA numbers (this step is also similar to the process for EPCS prescribers)
- Once identity proofing is successfully completed, the IDP Status will be updated to EDPSuccess_EPCS, and the IDP Code will be set to 2.
Grant and Finalize Steps
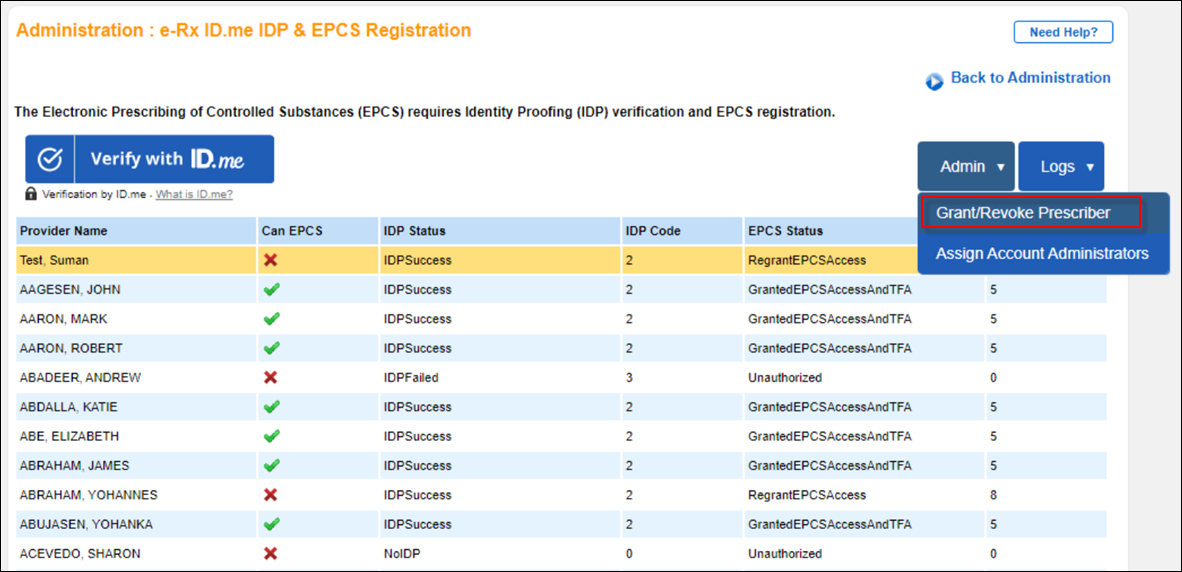
Grant Step
The Grant step is when an EPCS administrator confirms the identity of the prescriber. This is required by the DEA Audit. Anyone whose name is on the list and is NOT the prescriber can complete the Grant step as the EPCS administrator.
- In PM, select Admin.
- Select e-Rx ID.me IDP & EPCS Registration.
- Select Admin > Grant/Revoke Prescriber.
- In Grant EPCS tab, list of users who are ready to be granted EPCS access will be displayed.
- Select the name of the desired user and select Grant.
- The user is granted access and a message is displayed as Grant Successful.
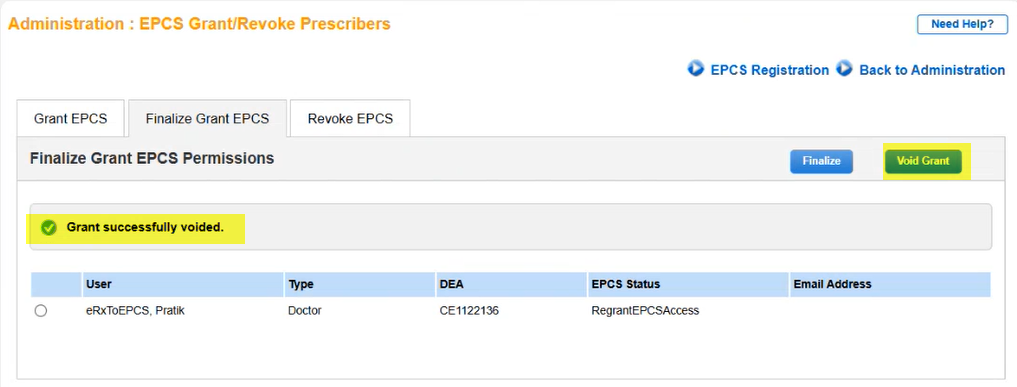
Void Grant
Once the user is granted EPCS access, you can void grant access to the user.
- Select Finalize Grant EPCS tab.
- Select the name of the prescriber who has EPCS Status as GrantedEPCSAccess.
- Select Void Grant.
- A message is displayed as Grant successfully voided.
- EPCS Status will be updated to RegrantEPCSAccess
Finalize the EPCS Prescriber
Once the user is granted EPCS access, you have to finalize grant EPCS access to the user
- Select Finalize Grant EPCS tab.
- Select the name of the prescriber who has EPCS Status as GrantedEPCSAccess.
- Select Finalize.
eRx Prescibers cannot do Finalize Grant
- You will be navigated to the Finalize EPCS Registration screen.
- Enter the Passcode from the Authenticator App to complete the EPCS Registration.
- Select Submit.
- The authentication is successful. A message is displayed as Finalize Grant Successful.
Congratulations!
You have completed the EPCS registration process. You must log out of NextGen Office and log back in to begin e-prescribing controlled substances.

