You can generate a batch of patient statements from the Statements page, which you can then either electronically transmit (if you are set up for electronic statements) to our third-party vendor who prints and mails the statements to patients on your behalf, or print the statements (from a PDF file) to mail to patients.
Note: Prior to generating a batch of statements, post and apply all insurance and patient payments, and confirm that you have created all secondary claims. If these are not completed, the statements will not be accurate. The recommended envelope size is #10 double window.
Generate a Statement Batch
- In NextGen® Office PM, select Billing > Statements.
- Select a template or select the statement formatting, statement options, and scheduling options.
Note: To edit a template on the Administration: Statement Templates page, select the template and select Edit Templates.
- Select Generate Statements.
Your batch is queued and appears under Statements History.
Note: Statements are batched at 6:30 PM Pacific Time. One month of activity appears under Statements History. The time zone under Statements History is Pacific Time.
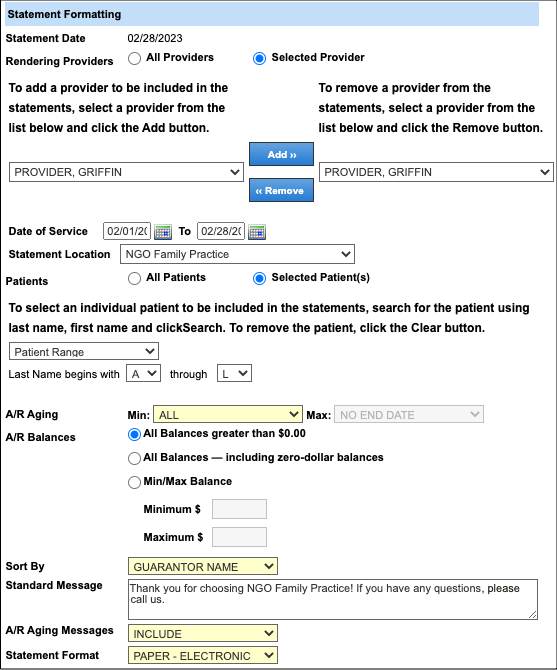
You can format statements in the Statement Formatting section.
Rendering Providers
- To generate a statement for the practice, select All Providers.
- To generate a statement for a specific rendering provider, select Selected Provider.
Date of Service
When you select a rendering provider, you can also select dates of service.
Statement Location
When you select a rendering provider, you can also select a statement location.
Patients
- To send statements to all patients, select All Patients.
- To send statements to a selected list of patients, select Selected Patients. Do one of the following:
- With Patient Search selected by default, enter the patient's name in the search box and select Add to move the patient's name to the right.
- To select an alphabetical range by the patients' last names, select Patient Range from the menu and select the letters to begin and end the alphabetic range.
A/R Aging
You can limit the statements to balances in the selected aging bucket.
A/R Balances
- All Balances greater than $0.00: Limit the statements to those patients with at least a $0.01 balance.
- All Balances – including zero-dollar balances: Limit the statements to insurance charges that have no patient responsibility. All patients who have a patient responsibility, even if the balance is now $0.00, receives a statement.
- Min/Max Balance: Enter a customized minimum balance and/or maximum balance to determine which patients receive a statement.
Sort By
You can determine how the statements are sorted.
Standard Message
You can set up the default standard message in Administration: Statement Messages.
A/R Aging Messages
You can select whether to include or exclude an A/R aging message. If you select Include, the statement includes the AR aging messages that you set up in Administration: Statement Messages, which are based on AR aging buckets.
Statement Format
- PAPER-ELECTRONIC: You must be set up for electronic statements to electronically transmit statements to our third-party vendor who prints and mails the statements to patients on your behalf.
- PAPER: Print the statements (from a PDF file) to mail to patients.
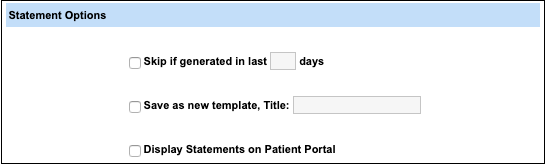
Select Statement Options
| Option | Description | User Action |
|---|
| Skip if generated in last x days | Skip generating statements for a selected number of days. | Select the check box and enter the number of days. |
| Save as new template | Save the statement format as a template. This template appears under Statement Templates as a saved template. | Select the check box and enter a title. |
| Display Statements on Patient Portal | Patients can view their statements in the NextGen Office Patient Portal. | Select the check box.
Make sure you have enabled the Patient Statements feature in Administration: Enable & Disable Features. |
Choose Statement Scheduling Options
- To generate statements on a schedule, select the Generate statements using this template on a schedule check box and select a delivery date.
- Select any additional options.
See Also

