There are three ways to grant access to the NextGen® Office Patient Portal for your patients.
Existing Patients
New Patients
- Send a self-registration invitation email to enable the patient (or patient representative) to complete the patient registration process and create their Patient Portal account all at once.
You can generate a temporary username and password within the patient chart. The patient uses these credentials to complete the account activation process at YourHealthFile.com.
- In the patient's chart, click Generate Password.
The temporary username, password, and account activation instructions are generated.
- To print the instructions for the patient, click Print Instructions. You can also customize your own instructions and print them out for your patients.
Note: Patients must not use the username or password provided in the example below.
The patient activates their portal account by navigating to
YourHealthFile.com, clicking
Activate Your Account, and following the account activation instructions. After validating the temporary username and password (provided in the printed instructions), the patient can choose a permanent username and password.
You can enable Patient Portal access for the patient, a guarantor, another patient in the practice, or any person outside of the practice. You can also enable access for additional charts associated to the patient. For example, in a pediatric practice, you can enable portal access for the parents of the current patient as well as the patient’s siblings.
Two Activation Options
- Email a one-click activation link. The patient (or patient representative) can activate the account without the need to validate temporary username and password credentials. Email invitations expire in five days.
- Print the activation instructions. Printed instructions expire in 10 days.
- In the patient’s chart, click the Administrative tab.
- Click Enable Portal Access.
Step 1: Identify the individual(s) getting access to the Patient Portal
Portal Access Options
You can select which individual is granted access. We provide examples of when to use each option.
| Individual | Example |
|---|
| Patient | The patient is an adult and is given access. |
| Guarantor | The patient is a child and the guarantor (parent) is given access. |
| Another Patient |
- The patient is an adult and the spouse (who is also a patient with the practice) is given access.
- Parent of several children who see the same provider and wants access to each Patient Portal account.
- Guarantors with multiple relatives in a nursing home who need access to each Patient Portal account.
|
| Other | The patient is a child and a parent (who is not a guarantor) is given access. |
Patient or Guarantor
The Guarantor option appears only if the patient and the guarantor differ.
- To grant access to the patient, select the Patient check box. To grant access to the guarantor, select the Guarantor check box.
- Select the method by which the portal instructions will be provided: Email or Print.
- If Email is selected, enter the email addresses of the selected individuals.
- Click Proceed.
Another Patient
You can set up proxy Patient Portal access to multiple patient records from a single login.
Examples
- Parent of several children who see the same provider and wants access to each Patient Portal account
- Guarantors with multiple relatives in a nursing home who need access to each Patient Portal account
- Click Another Patient.
- Search for the other patient.
- Enter the other patient’s email address.
- Click Proceed.
Other
You can provide proxy access to an individual outside of the practice.
- Click Other.
- Enter the individual’s first name, last name, and email address.
- Click Proceed.
Step 2: Identify the Relationship to the Patient
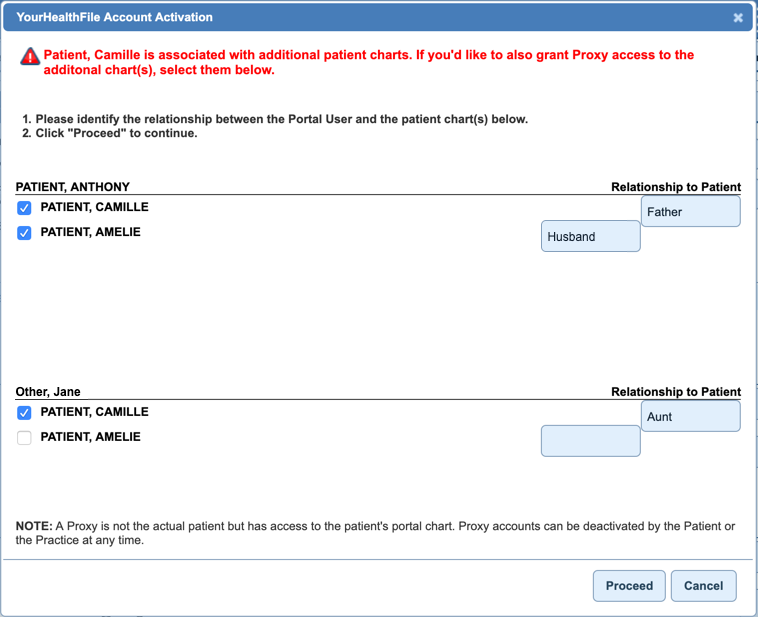
Select the relationship to the patient for each individual selected in Step 1.
Examples
Anthony Patient is Camille's father and also a patient at the practice. The practice is granting Anthony proxy access to his daughter's portal account. Since his daughter's account is associated with another chart (her mother, Amelie), you are asked whether you want to grant proxy access to that associated chart (Amelie) as well.
We are also granting proxy access to Jane Other, Camille's aunt. Jane is not a patient at the practice. You can also grant proxy access to Amelie's chart, but, in this case, we do not select her chart.
Additional Information
- If the system had identified other patient charts related to the current patient (e.g., siblings, spouse) the option to provide proxy access to those additional portal records is available by selecting the check boxes of the associated charts.
- If the email option is selected, an email is sent to the individuals with a link to complete the activation process.
- If the print option is selected, a temporary username and password is created for each individual. Print the instructions and provide them to the patient or patient representative.
- You can customize portal activation and login instructions and either email to, or print them out for, your patients.
You can send a self-registration invitation email from within Administration: Patient Data and when scheduling a new patient appointment.
Option 1 – Send Self-Registration Invitation in Administration: Patient Data
- Do one of the following:
- Click Admin on the menu bar and then click Patient Data.
- Hover over Patients on the menu bar and then select Patient Roster.
- Click the Self Registration tab.
- Click Send an Invitation to Self-Register.
The Self-Registration Invitation window opens.
- Enter the patient's name, email address, and phone number.
- Click Send Invitation.
The patient receives an email to register as a new patient at your practice using the Patient Portal.
Option 2 – Send Self-Registration Invitation When Scheduling the New Patient Appointment
- Schedule a new patient appointment.
- Click the Send Portal Invitation check box.
Note: An email address is mandatory. The check box is not enabled until you enter an email address.
- Complete the appointment form and click Save Appointment.
The patient receives an email to register as a new patient at your practice using the Patient Portal.
See Also:
Patient Portal Activation and Login Instructions
Send Self-Registration Patient Portal Invitations
Last Review Date: 11/22/25

