Super users (practice administrators) add or edit user IDs in Administration: User Maintenance. Add or edit user information, preferences, permissions, and roles. Creating unique user IDs and passwords for each user is essential for proper documentation and workflow management. User IDs are tagged to activities in both NextGen® Office EHR and Practice Management (PM). The setup and use of user IDs ensures that all users have proper access to the site, accurate user-based custom reporting, and EHR documentation.
Open Administration: User Maintenance
- Click Admin.
- Below Practice and Users, click User Maintenance.
Add a User
You have options to add a user, edit, delete, or disable an existing user ID, change the user password, and create a report.
| Icon/Option | Description |
|---|
| Add a New User | Create a new user |
 | Edit an existing user |
 | Delete a user |
 | Change a user's password |
| Enable | To disable the user, clear this check box. |
User Type
- If you select Provider, you must make a selection from the Provider select menu, which populates the provider's First Name and Last Name.
- If you select Staff, continue to Associated Providers.
User Role
User Role is used only for Prescription Drug Monitoring Program (PDMP) setup. Refer to Administration: PDMP Vendor Credentials Management.
Associated Providers
Select a provider(s) to associate to the user ID. This selection determines if this user ID is able to select that provider on claims, scheduling, and orders pages.
Enter User Information
If the user is a Provider, the first and last names are autopopulated.
- If the user is Staff, type the Last Name and First Name.
- Enter the user's Email.
- Enter a User ID (must be at at least six characters long) and Password (refer to Password Strength on screen).
- Select the default Location.
This is the location that the user will be logged into in EHR.
Associate a User to Locations
Associating a user with selected locations ensures that the Location drop-down menu only shows locations that are relevant to the user, increasing convenience and efficiency. After locations are added to My Locations, the filter only shows the locations that are associated to the user (for example, EHR Dashboard where the user selects the working location).
- To add a location to the user's My Locations list, select the location and then click Add to move the location to the right.
- To remove a location, select the location from the right side and click Remove to move the location to the left.
Permissions
Assign the user's permissions by selecting the check box(es).
| Permission | Description |
|---|
| Administration Rights |
- Grants users full access to Practice Management Administration pages
- Makes the user a super user
- Automatically selects all check boxes except Restrict Financial Information.
|
| EHR Admin | Grants the user full access to EHR Administration pages. |
| Restrict Financial Information | See Restrict Financial Information. |
| Eligibility | Clearinghouse use only |
| Precert Inquiry | For Aetna only.
Must be selected to view the Inquire About a Member's Precertifications page (Real Time > Authorizations > Precertification Inquiry). |
| Precert Add | For Aetna only.
Must be selected to view the Request Precertification for a Member page (Real Time > Authorizations > Precertification Add). |
| Referral Inquiry | For Aetna only.
Must be selected to view the About a Member's Referrals page (Real Time > Authorizations > Referral Inquiry). |
| Referral Add | For Aetna only.
Must be selected to view the Refer a Member for Specialty Care page (Real Time > Authorizations > Referral Add). |
| Claim Status Inquiry | For Aetna only.
Must be selected to view the Check the Status of a Claim for a Member page (Real Time > Claim Status > Claim Status Inquiry). |
| Claim Status Report | Clearinghouse use only |
| Claim Upload | Clearinghouse use only |
| Claim Status Display | Clearinghouse use only |
| ERA | Clearinghouse use only |
| Charge Entry | Clearinghouse use only. Cannot be deselected. |

Restrict Financial Information
The Restrict Financial Information permission affects PM users. NextGen Office PM does not support read-only access to Billing pages. If you want to restrict user access to ERA Dashboard and Charge Entry pages, select the Restrict Financial Information check box.
An ideal candidate for this selection is a front office staff member who only performs patient registration, scheduling, and eligibility tasks. These users are not allowed to create claims or view backend billing information.
The following settings apply to users with Restrict Financial Information selected:
- Hides the Billing module tab on the menu bar.
- Defaults their Reporting Role to Front Office (can be changed in Administration: Reports Role Permissions)
- News and Announcements and Learn More links do not show on the PM Dashboard.
Pharmacy Role
Select the user's pharmacy role.
The sample below is for an individual provider who does not require a supervising provider. Inapplicable roles are greyed out and cannot be selected. Hover over the role's name to view the description.

| Role | Description |
|---|
| None | The user (staff or provider) cannot access Pharmacy Alerts pages. E-prescribing, prescription printing, and adding prescription history features are disabled. |
| Admin Clerk | The user (staff) has read-only access to Pharmacy Alert pages. E-prescribing and prescription printing features are disabled. |
| Prescribing on Behalf of | The user (staff) may e-prescribe, print prescriptions, and add prescription history on behalf of any prescriber in the practice without the prescriber’s approval. |
| Prescriber with Supervisor (approval needed) | The user (provider), who may or may not have their own DEA number, may e-prescribe and print prescriptions, but all prescriptions must be approved by the supervising provider. The prescriber’s and the supervising provider’s credentials are both included on the prescription. |
| Prescriber with Supervisor (approval NOT needed) | The user (provider), who may or may not have their own DEA number, may e-prescribe and print prescriptions without the supervising provider’s approval. The prescriber’s and the supervising provider’s credentials are both included on the prescription. |
| Prescriber | The user (provider) is a prescribing provider who may e-prescribe and print prescriptions. Only the prescriber’s credential is included on the prescription. |
Reporting Role
Select the user's reporting role, which indicates which reports the role may access. Customize the permissions in Administration: Reports Role Permissions.

Direct Messaging
Select whether the user can send direct messages on behalf of a provider.
- Select the Allow Direct Messaging on Behalf of check box.
- Select a provider from the box on the left and click Add to move that provider to the right.
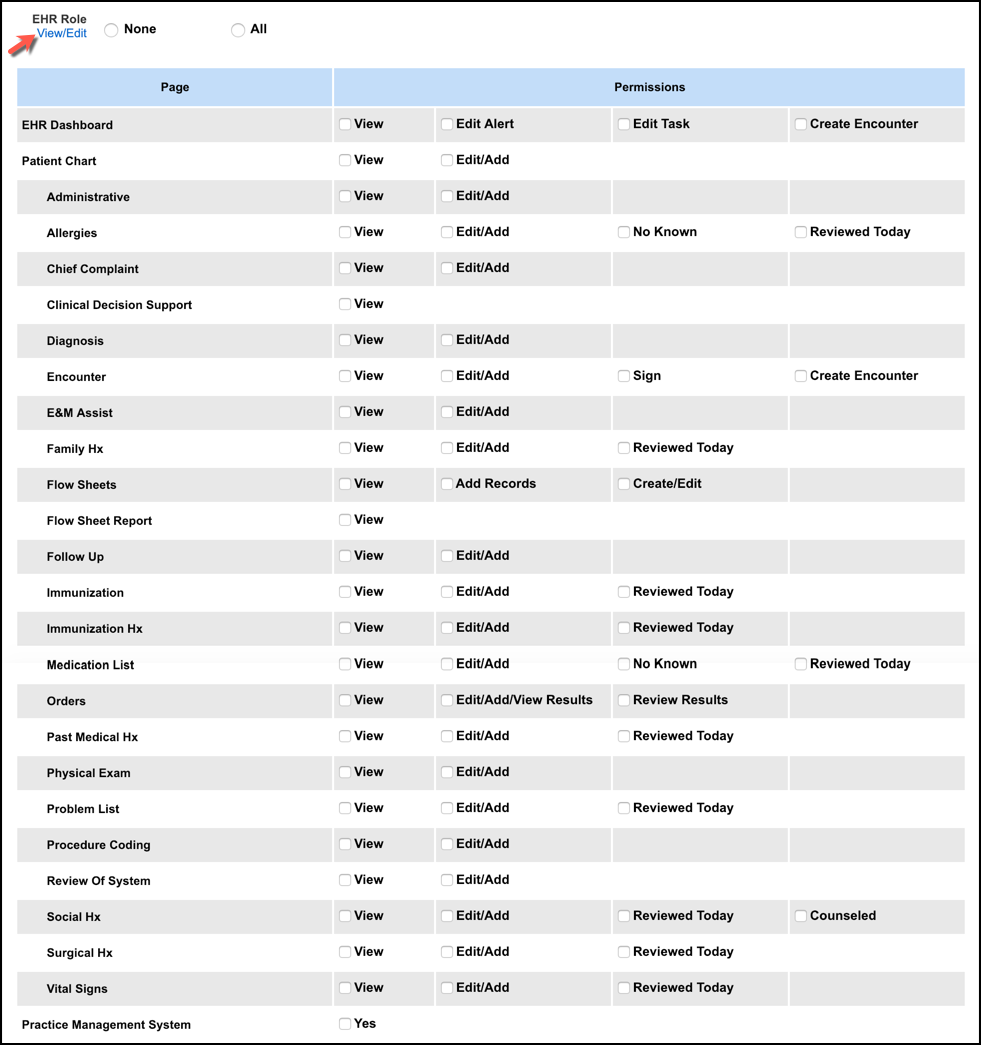
EHR Role
Assign the user's EHR role and permissions.
- To grant full access to EHR, select All.
- To view all of the EHR role permissions, click View/Edit.
- Select the check boxes for the desired EHR user permissions.
The following permissions are described in order of on-screen appearance.
EHR Dashboard
| Permission | Description |
|---|
| View | Grants permission to view the information on specific pages. |
| Edit Alert | Available in EHR Dashboard only. Grants permission to create and view alerts. |
| Edit Task | Available in EHR Dashboard only. Grants permission to create and view tasks. |
| Create Encounter | Available in EHR Dashboard and Encounters. Grants permission to create encounters. |
Patient Chart
| Permission | Description |
|---|
| View | Grants permission to view the information on specific pages. |
| Create Encounter | Available in EHR Dashboard and Encounters. Grants permission to create encounters. |
| Edit/Add | Grants permission to edit and add data on specific pages. |
| Sign | Available in Encounters only. Grants permission to sign encounters. |
| No Known | Available in Allergies and Medication List. Grants permission to a single selection of No Known Allergies or No Meds (no known medications) options on those respective pages. |
| Reviewed Today | Grants permission to enable single selection of the Reviewed Today option on specific pages. |
| Denial Defender | Available in Procedure Coding only. Grants permission to Denial Defender. |
| Counseled | Available in Social Hx only. Grants permission to select the Counseled option in Social Hx. |
Practice Management System
To grant access to PM, select the Yes check box.
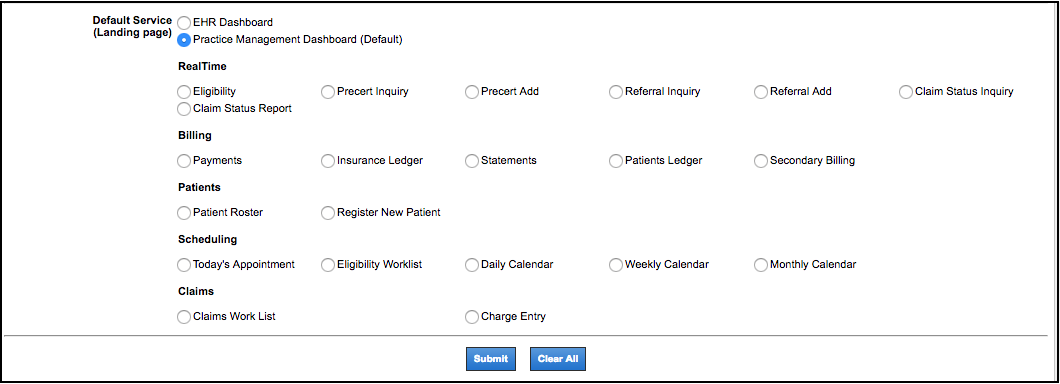
Default Service (Landing Page)
The default landing page determines which page the user lands on after logging in. Select the EHR Dashboard, Practice Management Dashboard, or a specific page in PM. If the user is a billing or front office staff member, select a specific page that the user will most frequently use as a default landing page.
After you have completed all user selections, click Submit.
Additional Options
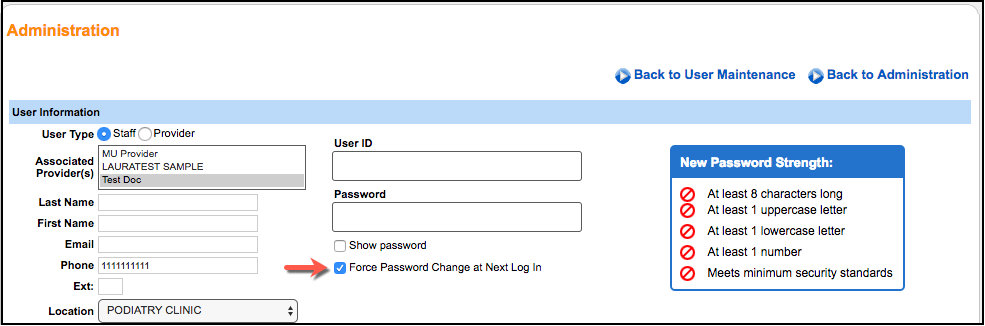
Force Password Change
To force the user to perform a password change at the next log in, select the Force Password Change at Next Log In check box.
Note: To create a new password, the user needs the temporary password that was created by the super user.
Create a Report
The option to create a report is on the bottom of the page.
- Select the Report Type.
- Usage: User log in, log out, and IP address
- Password: User IDs and passwords
- User Permissions: User permissions and role information
- For Name, select the desired user name or All Users.
- Select the date range (≤30 days).
- Click Create.
The example below is a user permissions report. The timestamp's time zone is Pacific Time.
Associate User with Providers
The practice providers who are associated with the user ID here appears on the associated providers select list.
- At the bottom of the page, click Associate User with Provider.
- Select New – [Add all practice providers].
- Select the User.
- Click Submit.
See Also:
Administration: Provider Maintenance - Rendering/Billing
Prescribing Roles
Last Updated: 4/25/25

