You can enter address information for your locations in Administration: Locations. This address information is used for scheduling, claims, reporting, e-prescribing, NextGen® Office EHR workflows, statements, and the Contact Us section of the Patient Portal.
The Administration: Locations section populates information in box 32 on the CMS-1500 claim form, can be selected from the Location drop down menu through Charge Entry, and can be selected in Administration: Provider Maintenance to populate the billing address in box 33 of the CMS-1500 claim form.
Add or Edit a Location
- In NextGen® Office PM, select Admin > Locations.
- To add a location, select Add Location at the bottom of the page. To edit a location, select the edit icon
 .
.
- Enter the location name.
- Optional: Enter the abbreviation (five characters) for the location.
Abbreviation is used to customize the first five characters of the location in the payment batch ID. The default is the first five characters of the location.
- Enter the address.
The city and state automatically fill when you enter the zip code.
Note: The Address1 field must contain the street address. You must not enter P.O. boxes, building names, and/or facility names. P.O. boxes may only be used for Statement Mailing Address options.
- Enter the main phone number in the Phone Work field. To add more phone numbers, select the blue and white plus icon
 .
. - Enter the fax number. A fax number is required for e-prescribing users.
- Select the office hours, which is used for scheduling only.
- Select the time zone.
- Select the place of service when location is used for billing purposes.
- Select Save Location Info.
Select Optional Settings
There are three optional location settings. Select the appropriate check box to apply the location setting.
| Setting | Description |
|---|
| Set as default POS for Charge Entry's Service Line | Sets this location as the default place of service (POS) for all service lines when the location is not selected in Charge Entry. |
| Make This Location The Default Location For: Statement Mailing Address | Sets this location as the default location for the statement mailing address. Note: Only one statement mailing address per account is permitted. Only one location can be the default location for the practice, but each provider may have their own settings. |
| Make This Location The Default Location For: Medications are prescribed at this location | Sets this location as a prescribing location.
- When you clear this check box, the location is no longer a prescribing location. Pharmacies, however, are not notified of this change and may still send requests to this location if prescriptions have been sent from this location.
- To take action on pharmacy requests sent from the disabled location, have the practice administrator set the location as a prescribing location.
- For pharmacies to discontinue sending pharmacy requests to disabled prescribing locations, you must deny the pharmacy request and create a new prescription from the desired prescribing location.
- Locations load based on session information so if another user updates settings, these changes are not reflected for other users until they log out and log back in.
|
Set Up Optional Primary Location IDs
| Primary Location ID | Description |
|---|
| NPI | The location NPI is used to check the prescriber's state Prescription Drug Monitoring Program through NextGen Office and for claim submission (box 32A on a claim form or loop 2310C/2420C NM109). If you do not need the location NPI to show on your claims in box 32A or loop 2310C/2420C NM109, do not select the Use the location NPI for billing check box. |
| CLIA Number | The CLIA number should be used when billing for laboratory claims. The CLIA number autofills on the claim if the location is selected in Charge Entry. Do not enter a Tax ID code or SSN unless all payers request this data. |
Optional Secondary Location IDs
If a secondary ID is required in box 32b it can be entered per payer. This option is only available after saving the information initially.
Add a Location ID
- In NextGen® Office PM, select Admin > Locations.
- Select Add another Location ID.
- Select the payer.
- Enter the ID.
- Select the ID type.
- Select Save.
Set Up Default Billing Providers
You can set up default billing providers for either selected payers or all payers.
- In NextGen® Office PM, select Admin > Locations.
- Do one of the following:
- To set up billing providers for all payers, select All Payers.
- To set up billing providers for a specific payer, select Selected Payers, and then select a payer.
- Select the default billing provider.
- Select Save.
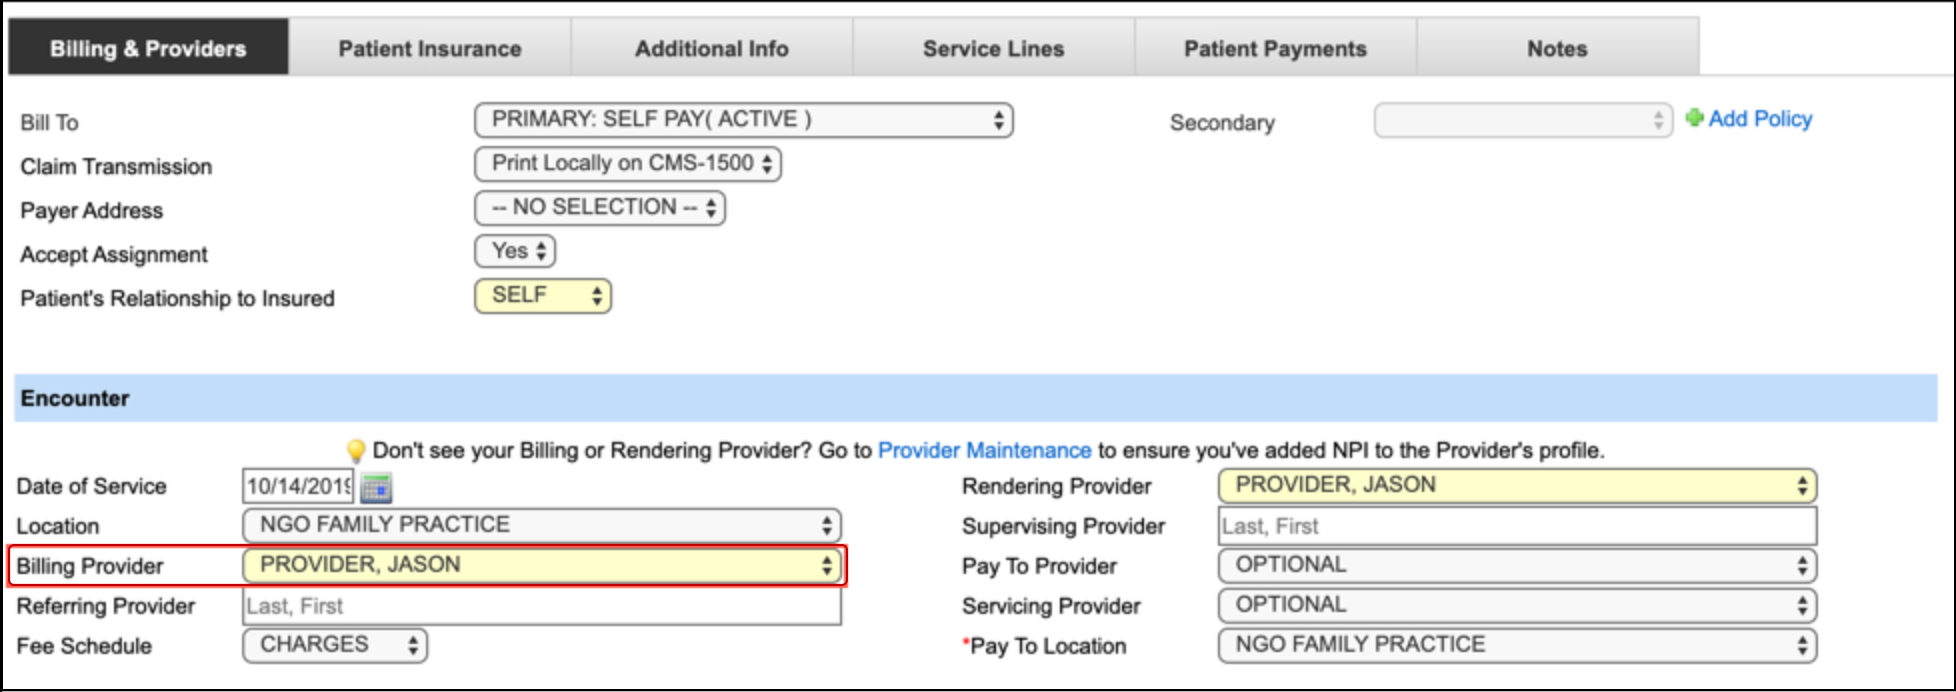
Default Billing Provider Shows in Charge Entry
The default billing provider that you set up for the patient's payer in Administration: Locations appears in Charge Entry on the Billing & Providers tab.
Set Up a Default Rendering Provider for a Scheduled/Servicing Provider
You can set up a default rendering provider for a scheduled/servicing provider in the Incident-to Billing Defaults section. This default setting does not apply to new patient appointments (per Medicare incident-to billing requirements).
Note: You can only set up one scheduled/servicing provider per location. You will be able to set up multiple scheduled/servicing providers per location in a future release.
When you start an encounter, the scheduled/servicing provider fills in the servicing provider field and the default rendering provider fills in the rendering provider field in the encounter summary.
- In NextGen® Office PM, select Admin > Locations.
- Select the edit icon for the location.
- Do one of the following:
- To set up providers for all payers, select All Payers.
- To set up providers for a specific payer, select Selected Payers, and then select a payer.
- Select the scheduled/servicing provider.
- Select the default rendering provider.
- Select Save.
Upload Locations
To facilitate the setup of practices with many locations, upload a CSV file containing location details.
- In NextGen® Office PM, select Admin > Locations.
- To search for the file on your computer, select Choose File.
- Select the CSV file, and then select Open.
- Select Upload.
The location is added to the list.
Last Review Date: 12/29/25

