You can use custom forms to create specific template forms in NextGen® Office EHR. Custom forms can be created on just about any page of the EHR and are extremely useful for documenting data during patient encounters.
Notes:
- We recommend saving and checking your work after each question.
- Custom forms may be moved to, or from, different SOAP sections..
- To move a custom form, you must Copy As New and then move the copy (with no patient data saved to it).
- If you would no longer like to see the original form, mark the form as inactive, but, be advised, all previous data saved to this form will be read-only.
To navigate to Administration: Custom Forms
- From the PM menu bar, click Admin.
- Under EHR Setup, click Custom Forms.
Create a Custom Form
When you create a custom form, you must associate it with one of the pages under Tab Manager. Within the pages, you must select a tab.
To select a tab, click the desired page's name. We selected Chief Complaint. If you do not see a tab you want to use, you can create a new tab.
Create a New Tab
- Click Add a New Tab.
- Select the Page on which the custom form is going to be used.
- Enter a Tab Name.
- Click Save.
Create a New Form
- Click Add a New Form.
- Select the Page and Tab that you want the form to appear on.
- Enter the Form Name.
- Select the Form Type:
- PDF: You must upload an editable PDF.
- Tabular: Format is question and answer for both input and output. Note: Tabular custom forms can be converted to Narrative custom forms
- Narrative: Format is question and answer input, but a paragraph for output. Narrative custom forms cannot be converted back to Tabular custom forms
- Click Create Form.
Add Questions and Answers
Notes:
- In tabular and narrative custom forms:
- Question
- Do not include a colon at the end of the question (example: How often do you exercise:). Colons are allowed anywhere else in the question.
- Do not include HTML.
- Answer
- Do not include commas in answers. Commas are allowed in output.
- Do not include a colon at the end of the answer. Colons are allowed anywhere else in the answer.
- Do not include HTML.
- Output
- Not available for tabular forms.
- Do not include more than one asterisk (*). One asterisk is allowed.
- Do not include HTML.
- Type the first question into the text box.
- Click Next.
- Select the Answer Type for this question.
- Yes/No
- Normal/Abnormal
- Number: Can only enter a number.
- Text: Can enter either number or words.
- Select List: A drop-down list of options to choose from, but can only select one.
- Toggle Through: Toggle through various options, but can only select one.
- Multiple Select: A list of options to choose from. More then one answer can be selected.
In our example, we selected Select List.
- You can select a default answer or have No Default Answer.
- To add more answers, click Add More.
- Type the Output.
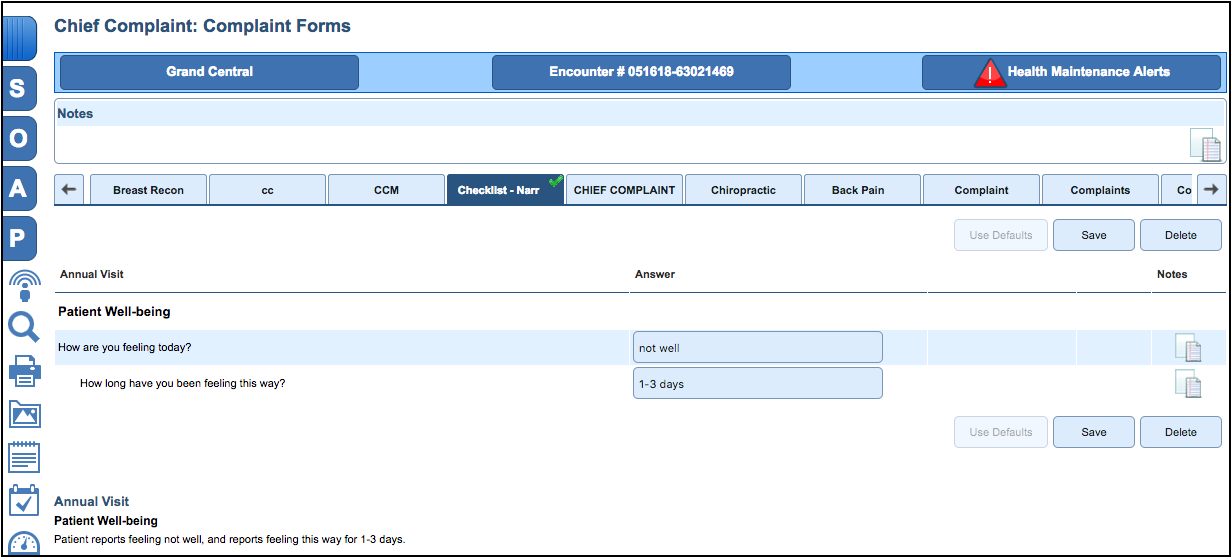
In our example, on the left, we typed answers that we want as options to select on the form. On the right, we typed the Output. The curly braces are used to fill in the value that is on the left side, resulting in the following sentences: The patient reports feeling well. The patient reports feeling not well. You can also type the complete sentence in without using the curly braces.
-
If you want to track the answer in a flow sheet, select a flow sheet and the column. You can also select New Flow Sheet.
- Click Next. If you do not want to add a follow-up question, click Next and then Next again.
- Click Save Question or Save & Add New Question.
- Continue to add as many questions as you need to the form.
- When you are done adding questions and answers, click Save Form.
Add a Follow-up Question
You can add an optional follow-up question and the output will be a separate part of the sentence separated by a comma.
- Type the question and click Next.
- Select the Follow-Up Answer Type and type the Output like you did in step 3 in the previous procedure above.
In our example, we selected Select List. We also added one more answer by clicking Add More.
- You can select a default answer or have No Default Answer.
- To add more answers, click Add More.
- Click Next.
- Click Save Question.
- When you are done adding questions and answers, click Save Form.
Add a Header
You can add a header for the question.
Notes:
In tabular and narrative forms:
- Do not create headers with the same name in the same form.
- Do not include a colon at the end of the header (example: Patient Well-being:). Colons are allowed anywhere else in the header (example: Patient Well-being: Pediatrics).
- Do not include HTML.
- Select the question.
- Click New Header.
- Type the header name.
- Click Add Header.
Default Forms
EHR has many default forms that can be used within the system. A quick way to create a custom form is to copy an existing form (Copy As New).

View Custom Form
To view the form in EHR, go the form's associated page and click the form's tab. In our example, we would go to the Chief Complaint page and click the Checklist-Narr tab.
Copying an existing custom form is an easy way to create custom forms.
- Under Form Manager, click Copy As New for the desired custom form. It is recommended to inactive form before selecting Copy as New option.
- Type the New Form Name.
- Click Save.
The copy appears as a new form.
- To make edits to this new form, click Edit.

Last Update: 6/30/2025

