You can customize check-in processes by appointment type for patients to complete in the YourHealthFile® Patient Portal. You are provided with one standard check-in process and can create as many custom check-in processes as you need for your practice. You can select which forms are presented to patients in the Patient Portal that are specific to appointment types. Patients can then complete the documentation prior to their visits.
Contents
Standard Check-in Process
Custom Check-in Process
Requirements
Navigate to Administration: Custom Check-in Processes
- From the menu bar, click Admin.
- Below Premium Portal Management, click Custom Check-in Processes.
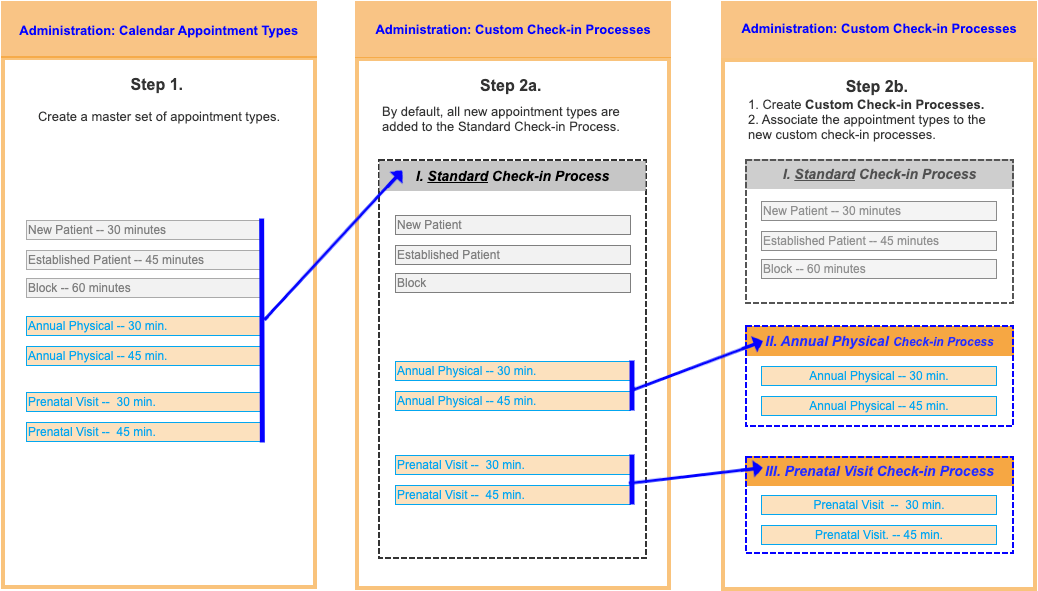
Appointment types, by default, are added to the standard check-in process. If you do not associate an appointment type with a custom check-in process, the patient will be presented with the forms selected in the standard check-in process.
- To add a form to the check-in process, drag and drop it from the left to the right. The cursor changes to a grabbing hand when you hover over a draggable form. Draggable forms also include
 on the left side.
 - To rename a form, click
 .
. - To remove a form, click
 . You cannot drag forms from the right to the left.
 - You can move check-in process forms up and down.
- To save changes, click Update Check-in Process.
- To revert the forms for the check-in process to the system default forms, click Reset Forms.
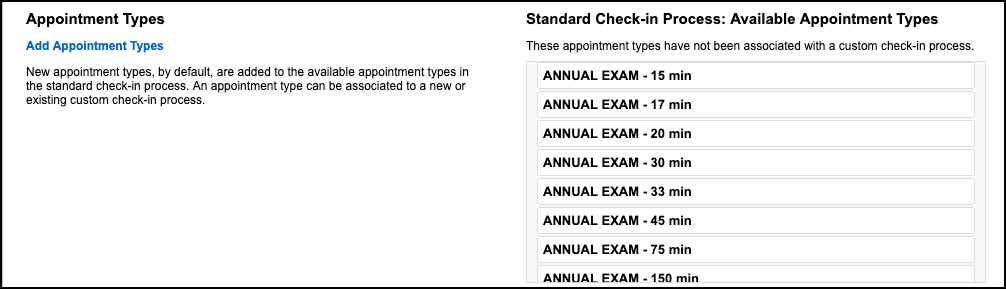
Available Appointment Types
Available appointments types appear in black, indicating that they cannot be deleted or moved. Appointment types can be associated with custom check-in processes. To create appointment types on the Administration: Calendar Appointment Types page, click Add Appointment Types.
Standard Check-in Process and Custom Check-in Process Comparison
| Standard Check-in Process | Custom Check-in Process |
|---|
| Appointment types, by default, are added to the available appointments. | Appointment types are associated with the custom check-in process and removed from the standard check-in process. |
| Available appointments types appear in black, indicating that they cannot be deleted or moved. | When appointment types are dragged from the left to the right, those selected appointments are removed from the standard check-in process. |
| Default check-in process forms are available. | Default check-in process forms are available. |
| Cannot rename. | Can rename. |
| Cannot delete. | Can delete. |
Create a Custom Check-in Process
- Click Add Custom Check-in Process.
- Enter the Check-in Process Name.
- Click Save Custom Check-in Process.
The new custom check-in process appears in the menu below Select a Check-in Process. To rename the custom check-in process, click .
Select Custom Check-In Process Forms
The steps are the same as the Standard Check-in Process.
- Drag and drop an appointment type from the left to the right.
As you drag and drop an appointment type, they are removed from the standard check-in process and associated with the custom check-in process. To remove a form, click
.
- To save changes, click Update Check-in Process.
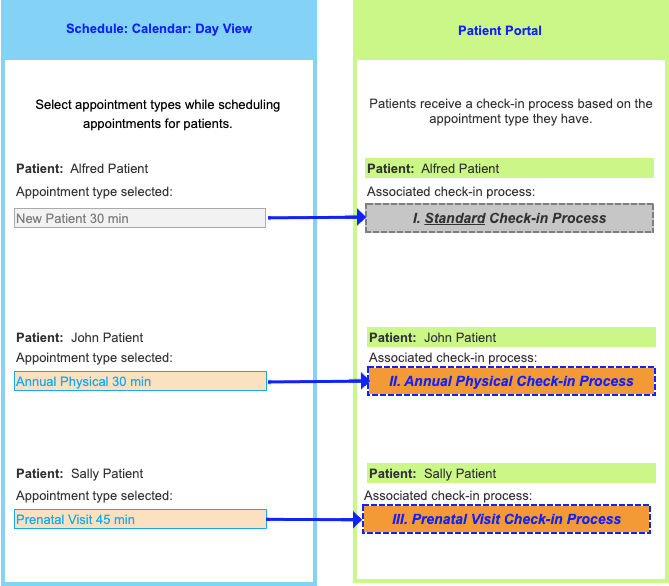
Example – Staff Schedules a Well Child 1 Year Appointment
- Select Schedule > Calendar > Day View.
- Click an appointment time.
- For Type, select Well Child 1 Yr - 30 min.
- Complete the form.
- Click Save Appointment.
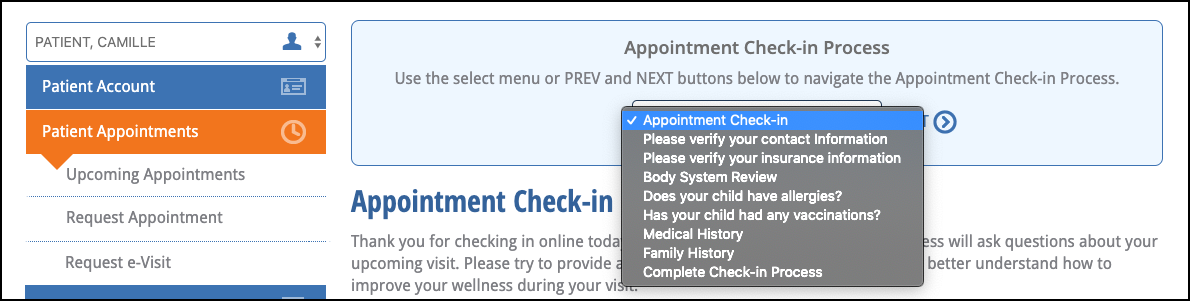
Example – Patient Completes the Well Child 1 Year Custom Check-in Process on the Patient Portal
Click Appointment Check-in. Only the forms specific to the Well Child 1 Yr - 30 min appointment type appear.
Example Workflow
See Also:
Administration: Calendar Appointment Types
Appointment Check-in Using the Patient Portal
Custom Check-in Processes FAQ
Premium Patient Portal Custom Check-in Processes Training Video
Last Update: 3/28/25

